Every day, businesses do hundreds of transactions. There is a need to keep all the accounting records up to date. Businesses may always stay one step ahead of their competitors if they stay organized and maintain their cash flow properly. Accounting is an essential component of any organization because it determines how the enterprise can expand. To handle their accounts and keep their books up to date, businesses utilize a variety of tools and applications.
You can easily handle every aspect of your company's accounting workflow with the aid of QuickBooks accounting software. Among other things, businesses use QuickBooks to issue invoices, take payments, and produce reports. Small businesses frequently utilize Xero which is another top accounting program. It facilitates rapid currency changes and offers analytics for the business's finances. Many companies use both software to maintain their accounts.
Companies share data from Xero to QuickBooks. There are a few features that are available in QuickBooks but not supported by Xero. So, there is a need to migrate data from Xero to QuickBooks.
The cloud-based accounting software is Xero. It is mainly designed for small and medium-sized businesses. It offers a wide range of tools like accounting, payroll, Inventory Management, Bookkeeping, and other financial services. With the help of QuickBooks, the user can automate their business, it will assist them in sales tax calculation, product tracking automatic transaction updates in the register, etc.
QuickBooks works on-premises or cloud. It is based on the version of the accounting application which can manage payments, and bills, accept payment bills, and the payroll functions. QuickBooks can connect with your bank and credit card account to download and categorize all the expenses. With the help of business statements and reports, the user can easily evaluate how their business is working.
Features of Xero
Some of the features of Xero are mentioned below:
- The reporting tool is the best tool for Xero as it is very helpful in tracking the finances of the company.
- Xero also helps in collaborating Xero with other members and advisors in real-time.
- With the help of Xero, users can pay or get paid with more than 160 supporting currencies with updated currency rates and instant conversations.
- Users can easily view short-term future cash flow, track metrics, and check their financial health with the help of the analytical plus feature.
- The user can easily connect with their bank account and bank feeds.
It delivers seamless transaction flow securely in the Xero account every business day.
Note: Before converting data from Xero to QuickBooks, make sure to clean up your older and unwanted entries in QuickBooks software.
Steps to convert from Xero to QuickBooks
In this, we learn how to send data from Xero to QuickBooks. Following are the steps to connect Xero to QuickBooks for transferring the chart of account data from Xero to QuickBooks.
1. Exporting data from Xero to a CSV file
To export data from Xero to a CSV file we have to follow the following steps:
- First of all, you have to log In to your Xero account with the help of a login ID and Password.
- Now go to the accounting tab and click on it.
- Select the advance option from the drop-down menu of the accounting tab.
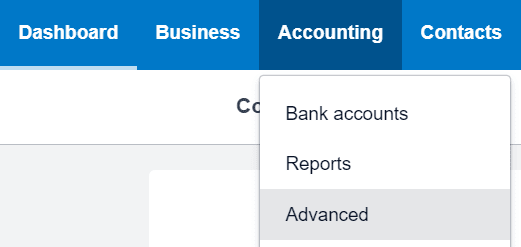
- Under the advance settings option hit the chart of accounts option.
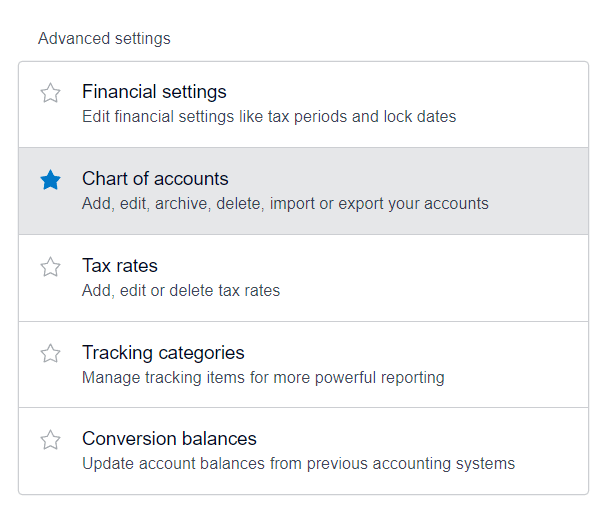
- It will open the charts of account data of your company.
- Now select the export button to export the Xero data file in a CSV file.

- Now last you have the CSV file which has the charts of accounts of data that you have to download to your local system.
You can choose a custom location to save the exported data file from Xero. Once you have it on the local storage, you can format the data.
When exporting from Xero, you don’t necessarily have to export all of your accounting data. You can narrow down and choose a specific data type to export from Xero to QuickBooks online. For these unique data types, you can first create a report, and then export the report in CSV format.
Note: after you export data for the particular data type, you can move on to Step #2 and follow the rest of the method to complete the conversion from Xero to QuickBooks Online.
Migrate Sales Tax information from Xero to QuickBooks Online
- From the Accounting menu, choose Reports.
- Click on Sales Tax Report.
- Choose one of the following options for the layout of the report:
- Show by Tax Rate
- Show by Tax Component
- Show by Account Type
- Click on Update.
- Click on Export, then choose CSV.
Migrate Inventory list information from Xero to QuickBooks Online
- From the Accounting menu, choose Reports.
- Click on the Inventory Item List report.
- Choose a date range.
- Click on Update.
- Customize the report as per your preference.
- Click on Export, then choose CSV.
Migrate Fixed Assets from Xero to QuickBooks Online
- From the Accounting menu, choose Reports.
- Click on the Fixed Asset Reconciliation report.
- Click on Update.
- Choose the information you want displayed by selecting particular Columns.
- Click on Update.
- Edit the name of the report.
- Click on Export, then choose CSV.
Migrate Pay Run (Payroll) data from Xero to QuickBooks Online
- From the Accounting menu, choose Reports.
- Click on Pay Run by Employee report.
- Go to the Employees section, then click on All or choose Employees for whom you want to migrate the data.
- Input From and To dates to choose a range.
- Click on Update.
- Click on Export, then choose CSV.
2. Formatting of The CSV file
By formatting the CSV file using a spreadsheet program such as Microsoft Excel, you can simplify the transfer process and make it easier to later map the fields properly. Even though formatting is a manual process, it doesn’t take long and makes this easier later on.
Follow the following procedure to format the CSV file.
- In any spreadsheet software first, you have to open the chart of account data.
- Now you have to make sure that you have the following columns with their names.
- The name of the account.
- The type of account that you have.
- Now detail the type of the account.
- The number
- If the company account is by the number then you have to add the column name “Account number”.
- If your account has subaccounts then you can also add a column name account name.
- Now save the file as the formatting is done.
While formatting the CSV file, you may find that one of the fields mentioned above is missing. In such a case, you should create a new field with the appropriate name. You can input the appropriate data for each account in the missing field and then save the changes.
3. Uploading of CSV file to QuickBooks
Now let’s come to the easier part of this whole process. In this step, you have to upload the CSV file exported from Xero to QuickBooks online. Once uploaded, the online accounting platform offers you the opportunity to map the fields to accurately migrate data.
Steps to upload the CSV file exported from Xero to QuickBooks:
- First, you have to log in to your Quickbooks account with the help of your Login ID and Password.
- Select the setting option and hit the import data option from the drop-down menu.
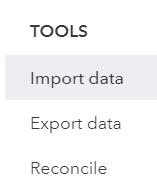
- The pop-up window will appear in front of you asking for the type of data you want to import.
- Hit the chart of accounts option.
- Select the browse button and select the open option to open the file.

- Once you select the browse option now you can locate your file on your local system where you saved your file after formatting.
- Once you find the file then you need to just upload it.
- Now hit the next button to switch the screen.
4. Mapping of the data with the QuickBooks
This is the final step. Once you’ve mapped the field, you can complete the conversion of Xero data to QuickBooks online. In this step, you have to correctly match the fields in the CSV file to the appropriate fields in QuickBooks online. This helps QuickBooks to identify the data that it should input in a particular field.
Follow the following steps to map your data with QuickBooks. This is the final step to connect Xero to QuickBooks.
- First, you have to navigate to your field option.
- Now hit the small down arrow in your field column.
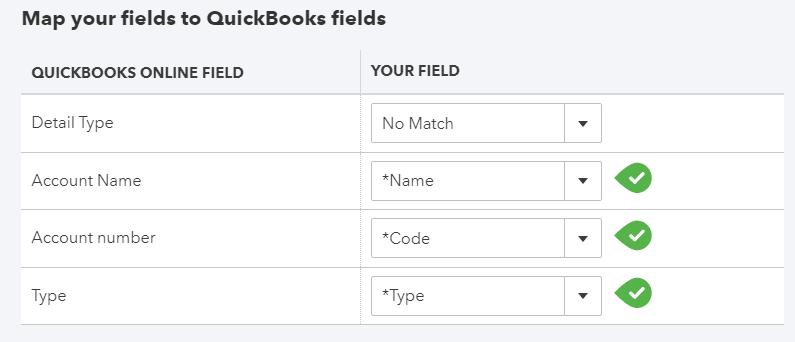
- Now, you can match the names of columns with the names of data to format the QuickBooks fields which are listed below:
- Detail of the type.
- Name of the account.
- The number of the account.
- Type.
- Once you are done with the mapping of the data hit the next button.
- Now you have to check all fields in case any of them is highlighted with red then you can fix it.
- Once you are done the fixing error then you are ready to import the data so click on the import button.
So. With the help of the above steps, you can easily transfer the data from Xero to QuickBooks.
Benefits of Connecting the Data from Xero to QuickBooks
QuickBooks and Xero are software that are widely used as accounting software. Both of them serve unique features. Most companies prefer to transfer or sync their data between these two platforms. Following are some of the benefits of transferring data from Xero to QuickBooks:
- Migrating the data from Xero to QuickBooks helps your company to stay compliant with the tax offices.
- As an online service provided by Xero, unsubscribing to in without migrating the data can cause the loss of data.
- QuickBooks serves a wide range of products which is very helpful in managing the accounting and finances of any type of industry.
- If the company uses Xero to QuickBooks to transfer their data then they can easily handle the toughest accounting challenges for the small, medium, or enterprise-level business with the help of QuickBooks Desktop Solution.
- If the company transfers its data through QuickBooks then it is very helpful to get a detailed view of your data in detail which is very important for better reporting and analytics tools.
Xero to QuickBooks which can be converted
Following is the list of Xero data that can be easily migrated from Xero to QuickBooks:
- Opening of the account balances
- Receivables and the payables.
- Credit cards and bank transactions.
- Credit notes and invoices.
- Credit bills and the bills.
- Customize mapping with the chart of accounts.
- The details of the suppliers and the customers.
- Inactive accounts, inactive contacts, or manual journals.
Xero to QuickBooks Which Can’t Be Converted
Some things can’t be converted from Xero to QuickBooks, They are listed below:
- Summary data of payroll.
- Multi-currency data.
- Vendors and customer credits.
- Item details are in the budget line.
- Location.
- Budget.
- Custom templates.
- Settlements of the Budgets.
- Previously memorized transaction.
- Transactions which is non-posted like purchase orders, estimates, and sales orders.
Exporting Accounting data out of Xero
To export the accounting data you have to follow the following steps:
- First, navigate to the accounting menu.
- From the list of menus select the advance option and click on the export accounting data.
- In case you want to add codes to the account you can in your chart of accounts.
- In case you don’t want to add codes then import them into other accounting products which may not work.
- According to your area, you have to select the product or tax authority that you want to import.
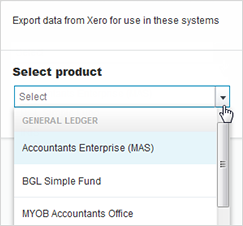
- Now select the range of data from where to where you want to export.
- Hit the Download option.

- In last save your file so the changes are also saved you have made.
Migrating the transaction to a new account
There are 10 simple steps to do transactions with the new accounting software:
- Finalize the last or the cutoff date.
- Inform your accountant.
- Now research and shortlist the right fit account for your transaction.
- Have a word or audit of your IT infrastructure.
- Take all the backups of your data.
- Before shifting the data take the trial of it.
- Define all the Quantifiable goals with the help of management.
- Formate and segregate your current data.
- Perform test runs on the imported data to check if the software works with minimal mistakes.
- Train and test your users before executing the new accounting software.
So, in this article, we learned how we can transfer the chart of account data from Xero to Quickbooks. With the help of this article, you are also able to know how Xero and QuickBooks help organize the company finances in a hassle-free manner and help the company increase its profit and business value. It also helps companies to get their financial data in one place and the company can easily analyze it without any hassle.
But as we know Xero stores crucial business finance data of the companies which are used by the company in analyzing and generating insight from it. So, sometimes working with it is not easy. Some issues or errors also arrises, so in that case, you can get help from our technical expertise via phone, chat, or mail. They will help you in resolving your issue without any loss of data.
Frequently Asked Questions
How can I transfer my QuickBooks files to Xero?
- First, you have to prepare the QuickBooks file.
- The file must be the US edition of QuickBooks 2007 or later, the single currency, and the data is not larger than 1GB.
- Now sign up for the Xero and upload your QuickBooks File.
- You can upload your QuickBooks files to the conversion tool only if your signing-up process of Xero is completed.
- Once you are done with the Data conversion is completed, so now you have to subscribe to Xero to access your converted data.
- First, you have to sign up for the new Xero account.
- Now enter the name of the organization whose data you want to transfer from QuickBooks online to Xero.
- Now hit the tick mark in the box beside the option “my QuickBooks file” and hit the continue button.
- Now you can easily convert QuickBooks online to Xero.
- You have to use the importing of the data tool.
- Convert the data from existing QuickBooks to a QuickBooks desktop file.
- You have to enter the data manually in the QuickBooks online forms and then check for the registers.


