


Converting from Peachtree to QuickBooks is a very simple process because Intuit has provided several tools that can aid you in the process. If you’ve already decided to Convert Peachtree (now Sage 50) to QuickBooks Desktop, you can find the required solutions in this post. You can rely on the QuickBooks data conversion tool to move your data from Sage 50 (formerly Peachtree) to QuickBooks. The conversion tool automatically transfers most of your accounting data, especially the most important one.
Table of Contents
- 1 Know QuickBooks and Peachtree
- 2 How to Convert Peachtree to QuickBooks Desktop?
- 2.1 Step 1: View the data that can and cannot be converted from Peachtree to QuickBooks
- 2.2 Step 2: Get ready to convert from Peachtree to QuickBooks Desktop
- 2.3 Step 3: Configure Sage 50 for data conversion to QuickBooks Desktop
- 2.4 Step 4: Load the QuickBooks conversion tool
- 2.5 Step 5: Start the Conversion Process
- 2.6 Step 6: Verify the Converted Data
- 2.7 The features of QuickBooks
- 3 Features of QuickBooks and Peachtree
- 4 System Requirements for Peachtree to QuickBooks Conversion
- 5 Manually converting transactions and lists from Sage 50 (Peachtree) to QuickBooks Desktop.
- 6 Conclusion
Know QuickBooks and Peachtree
What is QuickBooks?
QuickBooks is a major type of accounting software, which is developed and sold by a top-notch software package company Intuit. This software is perfectly designed for small and medium-sized enterprises. To make their account and bookkeeping work straight and simple. With the help of QuickBooks, the user will be able to perform multiple accounting tasks.
- Managing payroll
- Managing Income and Expenses
- Tracking the financial business health
- Bill management and payments
- Accept and forward business payments
- Monitoring the growth in the business.
- Configuring reminders for future payments to be made.
What is Peachtree?
Peachtree Accounting Software is developed by Sage Software Package for Small and Medium Sized Enterprises. Currently, everyone knows by the name of Sage 50. This software allows accountants and managers to accomplish some great work. that takes a lot of time if it’s done by any human. Some features are given below, which process the Sage 50.
- Tracking bank transfers and payroll.
- Creating financial statements.
- track Invoices
- Import and Edit Spreadsheets
- Pay attention to the payable and Receivable
- Processing scanned invoices, receipts, and checks.
How to Convert Peachtree to QuickBooks Desktop?
The QuickBooks conversion tool does not work with Peachtree/Sage 50 version 2014 or older. And it doesn’t work with industry-specific versions of Sage accounting software.
Step 1: View the data that can and cannot be converted from Peachtree to QuickBooks
You can convert the following data from Peachtree (Sage 50) to QuickBooks:
- Transactions for vendors and customers
- Account balances
- Vendor, customer, employee, item, and account lists
- Paycheck information in Journal Entry format
- Employee profiles
- Information general ledger account balance
You cannot convert the following data from Peachtree (Sage 50) to QuickBooks:
- Fixed assets
- Closed Purchase Orders, Sales Orders, and Estimates
- Work tickets
- Hourly and salary payroll items
- Payroll deductions for Social Security and Medicare insurance
- Deductions from wages of employees and contractors.
Additional information about Sage 50 (Peachtree) data that you need to note when converting to Quickbooks Desktop:
- QuickBooks desktop supports charts of account numbers only up to 7 digits. If any account number in Sage 50 is more than 7 digits, then make the required correction, or the conversion process will fail.
- All Sage 50 transaction data – despite the currency that it is recorded in – is recorded in QuickBooks in the home currency.
- Not all reversing journal entries are recorded in QuickBooks from Sage 50.
- You should verify the transactions after the conversion process to make sure that the data has been transferred accurately.
Step 2: Get ready to convert from Peachtree to QuickBooks Desktop
Before you can use the conversion tool to bring over your data to the QuickBooks desktop from Sage 50, you need to get a few things in order. Here’s a list of the things that you should do before converting your accounting data:
- Install and activate QuickBooks desktop
The conversion tool will directly move the data into a new company file that is compatible with the QuickBooks desktop. If you don’t have the software installed on your system, then you won’t be able to verify the conversion of your accounting data. - Store your accounting data on your local hard drive
Instead of storing the data on a separate server, make sure that you bring the data over to your local hard drive on which you’ll run the QuickBooks conversion tool. - Back up your Sage 50 data.
To make sure that you have a copy of your accounting data even if something goes wrong with the original company file, you should create a backup of your Sage 50 accounting data with the steps given below:- Launch Sage 50.
- Click on File, then Back Up.
- Choose the option to Include Company Name so that the backup file’s name describes the data that it stores.
- Click on Include Archives, especially if you’ve used Sage 50 to file taxes online.
- Click on Include Attachments. This prevents the loss of any documents that you may have attached to transactions in Sage 50.
- Click on Backup.
- Choose the appropriate directoryand click on Save, then OK.
You’re now ready to convert all of your Sage 50 (Peachtree) data to QuickBooks desktop data.
Step 3: Configure Sage 50 for data conversion to QuickBooks Desktop
You need to alter preferences in Sage 50 so that you can use the conversion tool to bring over the data to the QuickBooks desktop. After configuring Sage 50, you can then configure the data conversion tool with the information that you have in Sage 50.
Here are the steps to configure Sage 50 (Peachtree) for QuickBooks data conversion:
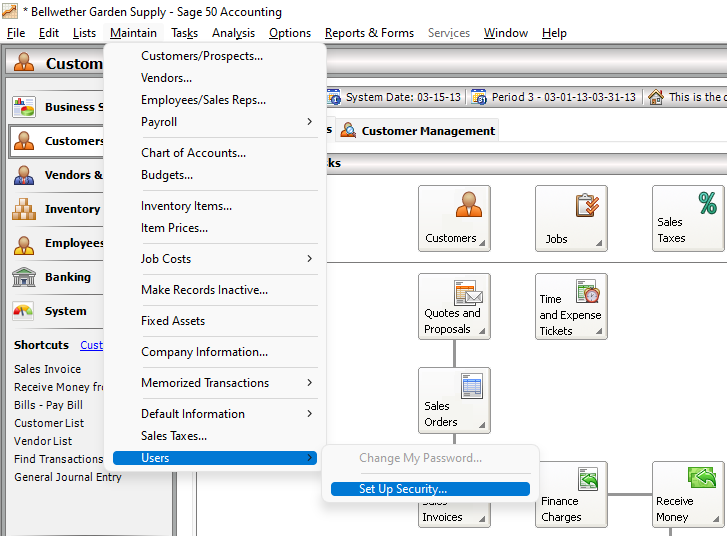
- Launch Sage 50 and choose the company file containing the data that you want to transfer.
- Click on Maintainfrom the main menu.
- Choose the Usersoption, then Set up Security.
- Click on the DataAccess/Crystal Reports tab, then choose the following login information option.
- Choose change, then input a new password so that you can later authenticate data conversion.
- Click on OKto save the new password.
The password that you create in this step will be required later by the conversion tool to access the accounting data in your Sage 50 company file. If the password doesn’t match, the conversion process will fail.
Also read this: How to Convert NetSuite to QuickBooks Online
Step 4: Load the QuickBooks conversion tool
The QuickBooks conversion tool is provided by Intuit and is completely free to use. You can download this program on your system and run it as an administrator to provide it with the required access level to make changes to files on your system.
Here are the steps to load the QuickBooks conversion tool, which you’ll use to migrate your accounting data:
- Download the QuickBooks conversion tool.
- Open the file that you downloaded and find the QuickBooks conversion tool icon.
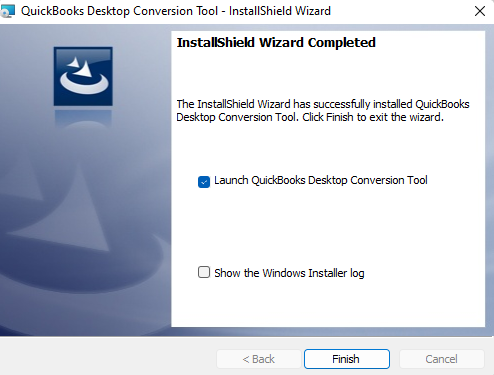
- Right-click on the icon, then choose Properties.
- From the Compatibility tab, choose Windows 8 for “Run this program in compatibility for”.
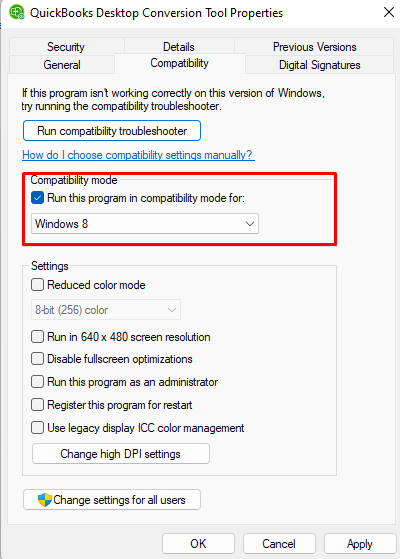
- Mark the option to Run as Administrator. Click on OK.
The tool is now ready to use. All you need to do is link it with QuickBooks and Sage 50 (Peachtree) to begin the accounting data conversion process.
Step 5: Start the Conversion Process
Let’s come to the conversion process now. In this step, you have to choose the database that contains your accounting data so that the conversion tool can extract that data and create a new company file with it.
Here are the steps to convert Sage 50 (Peachtree) data to QuickBooks desktop:
- Launch the Conversion toolfollowing the previous step.
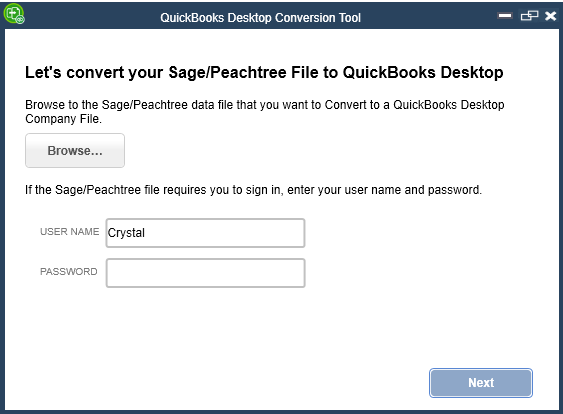
- Choose Browse.
- Choose the Sage 50 company filethat you want to convert to QuickBooks Desktop.
- Click on the databaseName drop-down menu, then choose your Company File.
Note: if the database contains multiple company files, then you’ll have to go through them and choose the one that you want to convert to QuickBooks Desktop
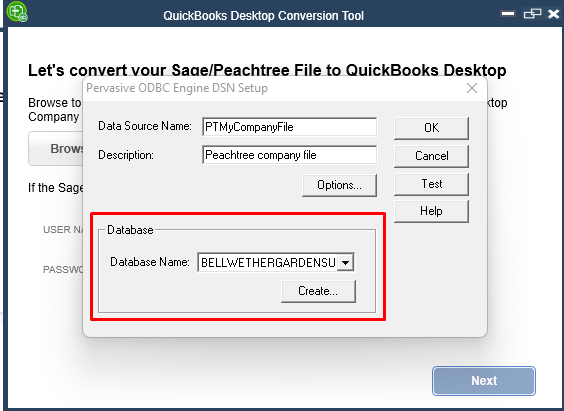
- Enter the password that you created earlier in Step 3, which had you configure the Sage 50 program. Click on Next.
- Choose the QuickBooks version and edition.
Note: the version is the year, for instance, QuickBooks Desktop. The edition is one of Pro, Premier, and Enterprise.
- Click on Browse, and choose the directory to which to save the converted data file.
- Review your preferences, then click on Convert File.
- When QuickBooks automatically launches, give it access to the file.
- For each certificate that QuickBooks prompts you with, click Yes, then Continue.
The conversion tool will keep running until it converts all of your Sage 50 (Peachtree) data that can be brought into QuickBooks Desktop. When the process is completed, the tool will give you a message.
Choose Open in QuickBooks once the conversion process is complete. QuickBooks will launch and you’ll be able to review your data post-conversion.
You may read this: How to Convert SAP Business One to QuickBooks
Step 6: Verify the Converted Data
After the conversion process finishes, you should verify the data that was converted to make sure that your books are still accurate. You can do this by analyzing the failed transaction log and creating reports such as balance sheets.
Here are the steps to view the failed transaction log for Sage 50 to QuickBooks conversion:
- Launch the File Explorerfrom the Startmenu.
- Open the directory C:USERS[Username for Windows account]My DocumentsIntuitQuickBooks.
- Open the Failed Transaction Log file in the directory.
The log will list all of the transactions that weren’t brought over into QuickBooks from Peachtree. You can either manually import these transactions into QuickBooks or reconvert the data by following the entire method again. The error generally occurs when users skip some of the steps mentioned above.
If the process fails, then you’ll get one of the following error messages:
- “It looks like something went wrong”
- The Sage 50 company file may not be stored locally. In this case, create a copy of the company file and save it on the local hard drive.
- You didn’t remove special characters from the name of your Sage 50 company file or use a special character when naming the converted QuickBooks file.
- Your Sage 50 company file has some internal error which has to be fixed before you can complete the conversion to QuickBooks.
- “We just need a little more info”
- This message generally occurs when users don’t set the compatibility mode for the conversion tool. We’ve defined the steps for the same Step 4 – load the QuickBooks conversion tool.
You can also create reports, such as a balance sheet, to verify the accuracy of your converted data.
To create a balance sheet in QuickBooks Desktop, you can follow these steps:
- Click on Reportsfrom the main menu.
- Hover over Company & Financial.
- Click on Balance Sheet Standard.
- Choose the As of date. (you can select today’s date.)
You can now view the summary balance sheet. If the total assets do not equal total liabilities and equity, then you need to manually enter the leftover transactions in QuickBooks.
The features of QuickBooks
- QuickBooks has a very clean-up and user-friendly interface
- QuickBooks supports both Mac and Windows versions
- QuickBooks has also launched an online version that can be done anytime, anywhere.
- QuickBooks also has a cloud-based interface.
Features of QuickBooks and Peachtree
| Features of QuickBooks | Features of Peachtree |
| QuickBooks has a very clean-up and user-friendly interface | Peachtree can manage inventories as LIFO, FIFO, and serialized |
| QuickBooks supports both Mac and Windows versions | 40 users can work on it simultaneously. |
| QuickBooks has also launched an online version that can be done anytime, anywhere. | To check for duplicate and suspicious entries, a feature called Gap comes in Peachtree. |
| QuickBooks also has a cloud-based interface. |
QuickBooks and Peachtree Both accounting packages are world famous. Though Peachtree software is a great package for bookkeeping and accounting and you just need to maneuver in QuickBooks for the performance of Higher Expertise and Advanced Financial. If you want to convert your platform from Peachtree to QuickBooks, then you have to understand all the processes given in this post.
System Requirements for Peachtree to QuickBooks Conversion
Converting Peachtree to QuickBooks Desktop is done using the QuickBooks Desktop Conversion Tool. This tool only converts the 2013 version of Peachtree or the higher version of QuickBooks. This tool fully supports QuickBooks Desktop Professional, Premiere, and Enterprise 2016. This is required to convert Peachtree into QuickBooks.
- Microsoft .NET system rendition 2.0.0. You might encounter a Quickbooks .net system error on the off chance that you don’t have it appropriately installed.
- Peachtree and QuickBooks Desktop ought to be installed on a Windows 10-based system
- 512 MB of Slam and 2.5 GB of Free Hard Drive
Manually converting transactions and lists from Sage 50 (Peachtree) to QuickBooks Desktop.
While you can use the QuickBooks conversion tool to convert most of your data from Sage 50, a lot of lists and transactions may not get converted because of the limitations of the conversion tool. In such cases, manually converting the transactions by exporting from Sage 50 in CSV format and then importing into QuickBooks desktop becomes necessary.
1: Migrate vendor lists from Sage 50 (Peachtree) to QuickBooks Desktop
Steps to export the vendor list in CSV format from Sage 50 to import into QuickBooks:
- Launch Sage 50.
- Click on the Reports menu.
- Click ok Lists, then Vendors.
- Choose the Vendor lists that you want to export.
Note: you can choose the “select all” option to choose all the available lists.
- Click on OK.
- After Sage 50 generates the Vendor List Report, click on File, then Export.
- Choose the directory to which you want to export the vendor list in CSV format.
- Click on Save.
Sage 50 will export all the vendor lists that you chose. You can find the CSV file containing the vendor lists from Sage 50 (Peachtree) in the location that you chose in Step 7.
Before you begin to import vendor lists from Sage 50 into the QuickBooks desktop, you need to launch the CSV file using Excel and adjust the columns to make the data compatible with the format that the QuickBooks desktop can import.
If you find this process difficult, then our QuickBooks experts can help you with the same.

Steps to import vendor lists in CSV format from Sage 50 to QuickBooks Desktop
- Download QuickBooks Import Excel CSV toolkit.
- Choose the directory to which you want to save the executable, then click on Save.
- Double-click on QuickBooks_Import_Exceland_CSV.exe.
- Choose Browse and select the folder in which you want to extract the files for the toolkit.
- Click on OK and wait for the extraction process to finish.
- Launch the Toolkit and follow the on-screen instructions to import the files.
- Choose the vendor list that you exported from Sage 50.
- Wait for QuickBooks to import the data.
You’ve now successfully imported the CSV file containing vendor details into QuickBooks desktop.
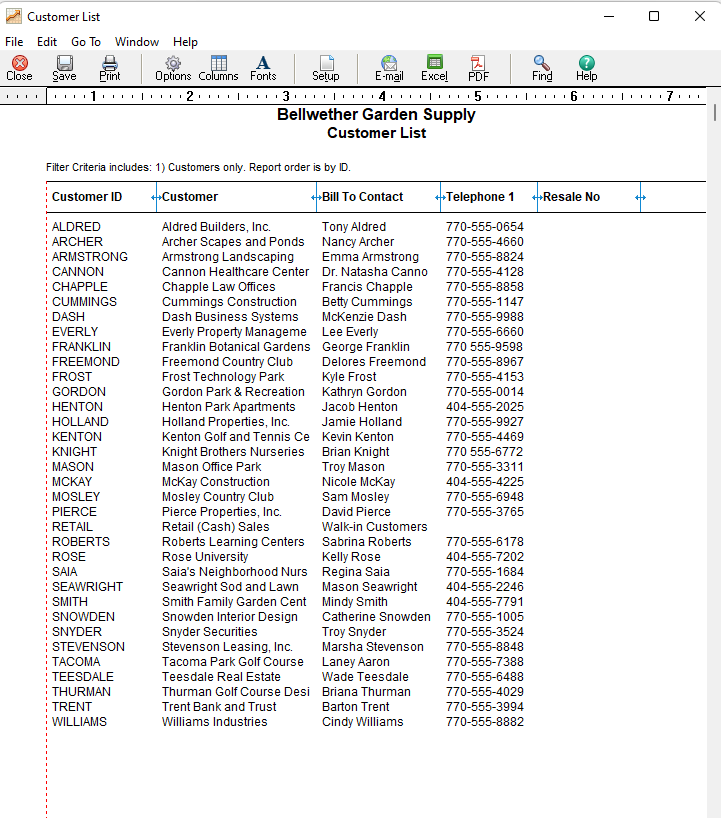
2: Migrate customer lists from Sage 50 (Peachtree) to QuickBooks Desktop
Steps to export the customer list in CSV format from Sage 50 to import into QuickBooks:
- Launch Sage 50.
- Click on the Reports menu.
- Click ok Lists, then Customers.
- Choose the Customer Lists that you want to export.
- Note: you can choose the “select all” option to choose all the available customer lists.
- Click on OK.
- After Sage 50 generates the Customer List Report, click on File, then Export.
- Choose the directory to which you want to export the customer lists in CSV format.
- Click on Save.
Sage 50 will export all the customer lists that you chose. You can find the CSV file containing the customer lists from Sage 50 (Peachtree) in the location that you chose in Step 7.
Before you begin to import customer lists from Sage 50 into the QuickBooks desktop, you need to launch the CSV file using Excel and adjust the columns to make the data compatible with the format that the QuickBooks desktop can import.
If you find this process difficult, then our QuickBooks experts can help you with the same.
Steps to import vendor lists in CSV format from Sage 50 to QuickBooks Desktop
- Download QuickBooks Import Excel CSV toolkit.
- Choose the directory to which you want to save the executable, then click on Save.
- Double-click on QuickBooks_Import_Exceland_CSV.exe.
- Choose Browse and select the folder in which you want to extract the files for the toolkit.
- Click on OK and wait for the extraction process to finish.
- Launch the Toolkit and follow the on-screen instructions to import the files.
- Choose the Customer List CSV file that you exported from Sage 50.
- Wait for QuickBooks to import the data.
You’ve now successfully imported the CSV file containing customer details into the QuickBooks desktop.
3. Migrate chart of accounts from Sage 50 to QuickBooks Desktop
Instead of setting up a chart of accounts from scratch on the QuickBooks desktop, you can migrate the one you created in Sage 50. To do this, you have to rely on the chart of accounts report. The data is exported in CSV format, which can be imported directly into QB.
You’ll find the following information about each account in your chart of accounts in the export CSV file:
- Ledger Name of the account
- Control account
- Nominal code
- Tax rate
- Category
- Visibility
After exporting, you have to customize the CSV file so that you can import it directly into QuickBooks.
Note: QuickBooks supports charts of account numbers only up to 7 digits. So you should change the details of any account that doesn’t adhere to this limitation.
Steps to the export chart of account in CSV format from Sage 50 (Peachtree)
- From the settings menu, click on Business Settings.
- Choose the Chart of Accounts under the Financial Settings section.
- Click on Export Accounts.
- Choose CSV.
You’ll be notified by Sage 50 after the export process finishes.
Steps to import your chart of accounts from Sage 50 into QuickBooks
- Launch QuickBooks.
- From the Lists menu, choose Chart of Accounts.
- Click on Accounts, then Import From Excel.
Note: QuickBooks will prompt you to create a backup of the company file before you import data from the CSV file. I recommend that you follow the on-screen instructions and create a backup to safeguard your data.
- Click on Browse, then choose the CSV file that you exported from Sage 50.
- Choose the sheet that contains the chart of accounts that you want to import into your company file.
Conclusion
This guide shows how to convert data from Peachtree to QuickBooks Desktop. It covers automatic and manual methods. Intuit provides tools for importing and exporting data. You can download these tools from Intuit’s website. You can also use third-party add-ons for conversions. These may require a subscription fee. Choose trusted add-ons from Intuit’s marketplace. Avoid tools from unverified sources to prevent data theft or loss. Contact our experts for help with the migration process.

