Have you ever felt frustrated for making multiple mistakes in QuickBooks but you don’t know how to delete multiple transactions in QuickBooks? Or whether you're going to void it or are you meant to press delete? No fret, this blog helps you out to get rid of such situations.
In Quickbooks, the transactions that are not required or have any mistakes in the list of transactions can be deleted by checking the transactions that need to be deleted. In QuickBooks, there are miss prints or there are all matched transactions that create a copy in QuickBooks and that creates confusion so these transactions must be deleted by QuickBooks Online, Pro, and Enterprise.
Users can batch enter deposits, cheques, credit card charges or invoices, credit memos, bills, and credit memos in all QuickBooks Desktop editions and Enterprise 21.0 versions. In this article, we'll look at how QuickBooks Desktop allows you to enter and delete transactions by batch.
Important Points to Remember
Before performing the steps ahead, it is important to keep the following in mind:
- Before performing the steps discussed below, create a backup.
- To export transactions from another company file, copy multiple transactions from one company file to another.
- Using QuickBooks Desktop Accountant 14.0 and later versions, batch enters checks, invoices, credit memos, bills, credit card charges, and bill credits.
The Reason Behind the Lead You to Delete Transactions in QuickBooks Online
Here are the different reasons why you manage the delete transaction process. Here is the list of reasons to delete transactions in QuickBooks Online.
- When you have made a transition with some wrong details.
- The Transaction is undesirable.
- You have created the transaction erroneous transaction that is damaged.
How to Select Multiple Transactions in QuickBooks Desktop to Delete?
- In the QuickBooks account, go to the menu and click on the Banking option.
- Then select the correct account from which you want to select multiple transactions to delete.
- Select the tab Review.
- In this mark all the items that are required to be deleted by you.
- Now click on the button Batch Actions.
- Hit the cursor on the Exclude Selected option.
- After you are done, then go to the Excluded tab.
- Again, select all the transactions to delete.
This is the process of selecting multiple transactions in QuickBooks to delete. After this, you have to press the delete button to delete it all and then you are done.
Way of Deleting Multiple Transactions in QuickBooks Desktop
Use the batch delete/Void Transaction Utility in QuickBooks Desktop

When deleting takes place in multiple transactions firstly the mass data transactions are taken care of first then the normal charges. Items and the details of the transactions are deleted but are saved in one part of Quickbooks so that you can undo them if there is a mistake in deleting the transactions.
There are different steps to be taken to delete multiple transactions in QuickBooks. Multiple add buttons should be checked in the dialog box of QuickBooks. In the account option chart of accounts in QuickBooks, you can see a field or a class to be marked in the account. And you have to get rid of automatic check marks which do not need to be removed.
We can always remove or delete multiple transactions by checking marks on the selected items and these will be removed completely. So in QuickBooks online also multiple transactions can be deleted completely and all the transactions would be deleted.
Business brings so many people to come together. It is not the barter system in today's world. Everyone is working hard to earn dollars. In such scenarios, a businessman comes in touch with so many people to run his business.
Here comes the role of QuickBooks, which helps a businessman in managing all accounting and transaction-related information. It also helps you keep a check on your company/data files. It helps you manage and maintain all your daily requisites, bank transactions, and other relevant credentials a businessman deals with.
There are certain ways by which you can select the transactions.
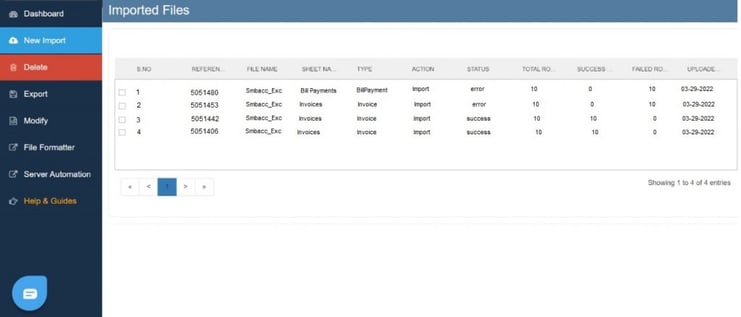
- You can select the transactions that are related to the uploaded file. To perform the task.
- Open the delete screen and click on the "Uploaded Files"
- Now, click on the Date Range that you want to select.
- Click on the Search
- Following the above step will get your result of the date range that you select.
- Click on the file and click on the transaction.
- Now, click on delete and this will delete the transaction that you have selected.
- Once, it is successfully deleted, it will be displayed in the respective list.
How to Delete Multiple Memorized Transactions in QuickBooks Desktop
Some steps help you in deleting the multiple memorized transactions in your QuickBooks account and they are as follows:-
- In your QuickBooks account
- Go to the List menu option
- Then click on the option name Memorized Transaction list
- Now, you have to select the transactions carefully that you want to delete
- Click on the drop-down menu of Memorized Transaction
- From the drop-down options click on the Delete Memorized Transaction
- Then click on the OK button.
How to Delete Multiple Transactions in Quickbooks Desktop
- In your QuickBooks account
- Click on the File menu option
- Then select the option Switch to the Single-user mode (if it shows as a switch to Multi-user mode then you don’t have to select it)
- Then you have to go to the Accountant menu option
- From the drop-down options, select the Batch Delete/Void Transactions
- Now choose the transactions to delete in multiple
- Click on the Review and Delete
- Then select the Backup and Delete option (Recommended)
OR
The backup can be skipped if you select the delete-only option
- For confirmation, click on the Yes button
- It takes some time to process it according to the list of transactions you are deleting.
How to Delete Multiple Transactions in QuickBooks Online?
- Open your QuickBooks account.
- Click on the Banking menu option that is at the top of the screen.
- Then from the drop-down Banking menu, you have to select the account in which you want to perform the deletion.
- Now, click on the For Review tab.
- In this, mark the items that you want to delete.
- You have to click on the button Batch actions.
- Then choose the Exclude selected.
- When it is done, go to the tab named Excluded.
- Again select or mark the transactions.
- After that, click on the option Batch action.
- In the end, click on Delete to delete multiple transactions in the QuickBooks Online account.
Delete Bulk QuickBooks Transactions with Uploaded Files

- Choose the "Already Imported Files" alternative on the delete screen.
- Select the suitable date range utilizing the calendar.
- Choose the search button.
- You will receive the search results based on the given date range.
- Select the file.
- Choose the transactions.
- Click the Delete Button to delete all the selected transactions. Picked transactions will be deleted from QuickBooks.
- The deleted transactions will show after the complete deletion.
Delete Bulk QuickBooks Transactions Entered Manually
- Choose the "QuickBooks Online (Real-Time)" Choice on the delete screen.
- Choose the QuickBooks Transaction Entity type. Ex: Invoice, Bill, Payment
- Select the specific data to type your purpose to delete
Search Yardstick
- Search By Created Date: Transaction or List Entity Creation Date ( The date when the transaction has been made in QuickBooks)
- Search By Transaction Date: The date at which the transaction occurred. Ex: Invoice Date, Bill Date
- Search By Last Updated Date: The date at which the Transaction or List Entity has been altered or upgraded in QuickBooks
- Select the suitable date range utilizing the calendar.
- Choose the search button.
- You will receive the search results based on the given date range.
- Select the file.
- Choose the transactions.
- Click the Delete Button to delete all the selected transactions. Picked transactions will be deleted from QuickBooks.
- The deleted transactions will show after the complete deletion.
For Support, Contact Us:
If you need information on how to manage multiple transactions in QuickBooks, you can get in touch with our Technical Support Team or Quickbooks Pro Advisor. You can contact us via smbaccountants.com. Our team will revert you with all the necessary information and solutions. You can also Import your transactions into Quickbooks whenever you want.
Frequently Asked Questions
How do I add an expense Transaction to my bank register?
Go to the left menu and select Accounting. Afterward, move to the Account Chart tab, then pick an account. Using the drop-down menu, select Add Check. After that, select Expense and fill in the necessary details. At last, click Save.
Can you reclassify multiple transactions in QuickBooks desktop?
First, log in to QuickBooks company accounts and select the transactions that you wish to reclassify. If you wish to reclassify every single transaction in your QuickBooks profile then the simplest way is to “Select All”. Select the Class and move the selected transactions to the new class or account. Go to the reclassify tab and all your transactions will be reclassified. At last, click OK once you’re done.
What are the features involved in batch delete transactions?
There are two main features involved in batch delete transactions:
- You can filter it by date range based on the date you last changed.
- It helps you to delete batch transactions easily and safely within QuickBooks Desktop.
How to change multiple transactions at once in QuickBooks Desktop?
- Open the account.
- Navigate to the top menu and click on "Lists."
- From the drop-down menu, choose "Add/Edit Multiple List Entries."
What does it mean to reclassify a transaction?
A reclass or reclassification refers to an accounting practice where an amount is moved from one general ledger account to another through a journal entry.
How do I Delete multiple journal entries in QuickBooks?
- Access your QBO account and navigate to the Banking tab.
- In the For Review section, select the checkboxes corresponding to the transactions you wish to delete.
- Click on the Exclude button.
- Move to the Excluded section and select the checkboxes of the transactions you want to delete.
- Once you have made your selections, click on the Delete button.


