
We all know that QuickBooks online is the best solution for small business accounting software. There are some advantages of QuickBooks Desktop over QuickBooks Online. QuickBooks desktop is much faster and it presents many options to cater to needs about inventories, reporting of actual job costs, etc.
Most of the information will transfer automatically from QuickBooks desktop to QuickBooks Online. QuickBooks also provides a list of desktop features that will help in transferring QuickBooks online.
Convert QuickBooks Desktop to QuickBooks Online
Seven steps are used to convert QuickBooks Desktop to QuickBooks Online. So, the following are the steps to convert QuickBooks Desktop to QuickBooks online:
- Check for the requirement of the file size.
- Preparing the QuickBooks desktop data to export it to QuickBooks online.
- Create the online account by signing up to create the QuickBooks online account.
- Export all of the company files that you want to export to the QuickBooks Online account.
- Now sign in to your QuickBooks online account with the help of a log-in ID and Password through the desktop version.
- Now search for your company in QuickBooks online to transfer it.
- Now you have copied the data file in the account.
Transferring the list Instead of Converting
The other way of converting your desktop file to the online company is to export important data from QuickBooks Desktop and import it to the QuickBooks online company. With the help of this, you can transfer the entire list like the chart of accounts, customers, vendors, products, and services. To transfer you always need to input beginning balances.
1. Steps to Transfer lists from QuickBooks Desktop to QuickBooks Online
There are two steps to transfer the list from QuickBooks Desktop to QuickBooks Online. So, the following are the two steps to transfer:
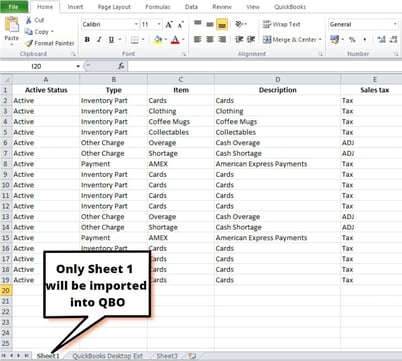
- First, you have to export the list from the desktop in the form of an Excel spreadsheet.
- Now you have to import that Excel spreadsheet into your QuickBooks online company.
Importing of QuickBooks Desktop Data to QuickBooks Online
Following are some instructions that we use to import QuickBooks desktop data to QuickBooks Online:
- Hit on the setting button to import the entire QuickBooks desktop company file.
- Select the import desktop data file to open the page that contains all the video lessons and instructions to import the data from the QBD version.
- Follow all the on-screen instructions in order to process it.
- If you need to update your system then update it and then make sure that you can export it to QuickBooks online.
- Now import it, once it is done then follow the on-screen instruction and verify your QuickBooks desktop data that it is imported correctly in the QuickBooks online.
Process of Exporting QuickBooks Desktop Data
1. Steps to Exporting of list from QuickBooks Desktop
To export the following list from QuickBooks Desktop to Excel. With the help of this, you can create a new online company, and still, it is very useful in saving hours of performing data entry jobs.
- Chart of accounts.
- Customers.
- Vendors.
- Product and services.
2. Steps to Exporting the chart of accounts
Following are some steps to export the chart of accounts from the QuickBooks Desktop:
- Select the company tab from the menu bar at the top of the screen.
- From the drop-down menu of the company hit the chart of accounts option.

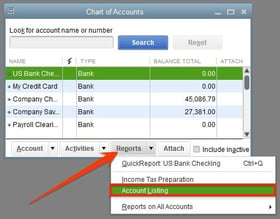
- The chart of accounts shows the list of your accounts.
- Select one of the accounts from all of the accounts.
- Once you select you will see the report option at the bottom of the screen.
- Now select the accounting list from the drop-down menu of the report option.
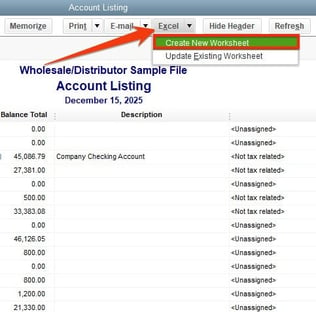
- In the Account listing report, you can view the Excel spreadsheet by clicking on the Excel sheet from the options of the menu.
- Hit the click on the create new worksheet option from the list menu and then follow all the instructions to save the worksheet to your computer.
3. Steps to Exporting Customers from QuickBooks Desktop
Follow the following steps to export the customers from the QuickBooks Desktop:
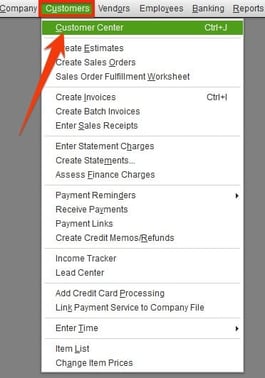
- Select the customer option from the top of the menu.
- Click on Customer Center from the drop-down list of customers.
- Select the Excel sheet option from the toolbar of the customer center.
- From the drop-down menu of Excel select the export customer list.
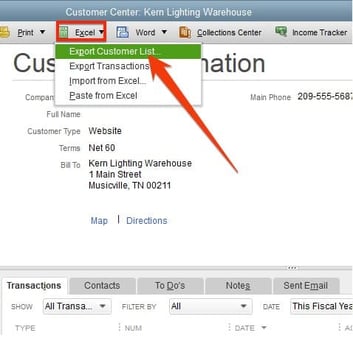
- Follow all the instructions to save the new worksheet on your computer.
- Once you are done with the above steps then you can easily import this sheet into your QuickBooks Online company later on.
4. Steps to Exporting Vendors from QuickBooks Desktop
Follow the following instructions to export vendor from the QuickBooks Desktop:
- Click on the vendor tab in the top menu bar of QuickBooks.
- Select the vendor center from the drop-down list of the vendor.

- Select the Excel sheet from the top bar and click on the export vendor list option.
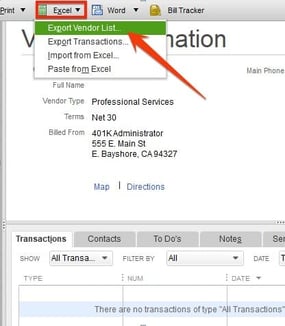
- Now you have to follow on-screen instructions to save the worksheet to import it in QuickBooks online later.
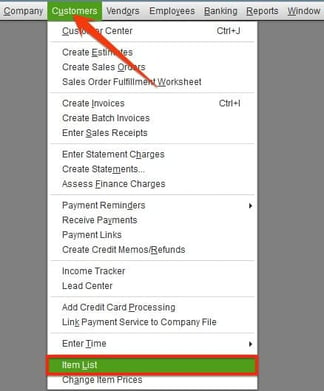
5. Steps to Exporting products and services from QuickBooks Desktop
Following is the procedure for exporting the products and services from the QuickBooks Desktop:
- Navigate to the customer tab in the top menu bar.
- From the drop-down list of the customer hit the item list.
- Now select the item from the list of items.
- As you select the item then at the bottom you can view the option named Excel, and click on it.
- Now select Export all items from the list of options in Excel.
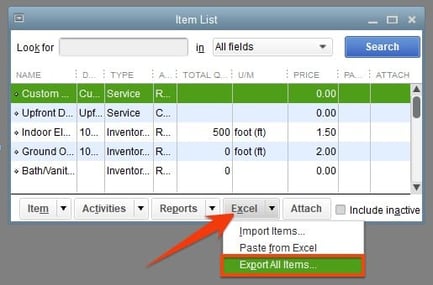
- Now you have to follow on-screen instructions and save the items as an Excel worksheet.
Process of Importing Data from QuickBooks Desktop to QuickBooks Online
1. Importing the list in QuickBooks Online
Small businesses have an online tutorial that will help you in learning that how to use QuickBooks online efficiently to manage your business. Three steps will help you import the file that you have created in the previous steps:
A. Setting up of customers
Follow the following steps to import the customer file which you have exported previously:
- First, you have to gather all the detailed Information about the customer.
- Information about the customer is like:
- Name of the company
- The name of the contact person.
- Address of the person.
- Email Address.
- Address of the website.
- Telephone numbers.
- The opening balance.
B. Setting up of the vendor
Follow the following steps to set up the vendor:
- Now first you have to provide the correct and detailed information about the vendor.
- Now you have to navigate to the vendor center.
- Now create the new vendor.
- Enter the vendor detail in the desired field.
- Now review the vendor setup according to the:
- Setting up of vendors.
- Setting up of products and services.
C. Setup of product and services
Follow the following steps to set up the product and services :
- Enter the details of the products which you buy and sell.
- Some of the important details are:
- Name of the product.
- Select the product in order to print the sales form.
- Select the product in order to print the purchasing forms.
- Number of stock-keeping units.
- Price of the selling products;
- Current price of the product which the customer purchased or purchased.
- Prefer vendor of the product.
- Product sales are subject to the sales tax.
- Keep track of the quantity of the items.
D. Information for service to sell
You need to fill in the following information for all the services which you sell.
- Service name.
- Service description to print on the sales form.
- Sales price or the rate you can charge as per your requirement.
- The service of the sale is subject to the sale tax.
- In case you purchase the service from the subcontractor.
- Describe the service which is to be print on the form.
- Cost changed by the subcontractor
- Name of the subcontractor.
- Go to the product and the service list.
- Now create a new item.
- Select the type of item.
2. Importing of Data from QB Desktop to QB Online
Following are the steps to import the data from QuickBooks Desktop to QuickBooks Online:
- First, you have to log in to your QuickBooks account with the help of a login ID and Password.
- From the menu bar click on the company tab and then select the export company file in QuickBooks online option from the list of options.
- Now from the other screen open your QuickBooks online account by adding your user ID and Password.
- Now you have to choose whether you want to import your inventory data or not.
- Navigate to the company name from the drop-down menu. In this, you have to select the company whose data you want to import.
- You also have the option to create a new one if you want by clicking on the Create a new company option.
- Hit the continue button and then OK or agree.
- The email notification is sent to your registered mail ID that the importing is done successfully from QuickBooks Desktop to Online.
Frequently Asked Questions
- First, you have to navigate to the file menu in the menu bar.
- Select the import button to import the data.
- Select the transaction and from the list of options select the type of transaction which you want to import.
- Navigate to the gear menu and select the export table template.
- Now you have to enter the name of the template and hit the OK button to save it.
- Now open the temple in the spreadsheet application.
- Add the transaction to your template and save your work.
- Once you are done with the above steps just follow these to import it:
- Navigate to the file menu. Select the import button.
- Click on the transaction which you want to import.
- Now you have to copy the transaction from your spreadsheet and paste it into the import Window.
- Select the bank in which you want to deposit the account.
- Once you are done with all the above steps. Check if everything is fine then click the save button to save the data.
How can I import the QuickBooks file into QuickBooks data?
- Open your QuickBooks with the help of a login ID and Password.
- Select the file tab from the top menu bar.
- Select import and then the next button to move forward.
- Now hit the web. Connect the button and then select the .qbo file which you want to import.
- Click on the Open tab to open the file.
How can I manually import bank transactions into the QuickBooks desktop?
- First, you have to go to the file menu.
- Now select the utilities.
- Select the import button.
- Select the file that is connected to the web.
- Now select the QBD file that you want to open.
- In case the account is already created then it is good but if it is not already created then you have to create it by clicking on the new QuickBooks account.
- Hit the continue button to move forward and save the changes.
So, in the above article, we have read how we can import QuickBooks Online files to QuickBooks Desktop. We are hopeful the above article will help you in importing the file successfully. But in case you are not able to import then you can call our helpdesk team or drop an email. Our technical experts will help you in resolving the issue and import your data from one system to another in no time.