The credit line serves as a lifeline for small business organizations because it provides you with immediate financing that is needed for payroll and management of everyday expenses. By setting up the line of credit in QuickBooks, you can easily simplify your cash flow, boost your saving & expense management.
What is a Line of Credit in QuickBooks?
A line of credit in QuickBooks is the loan given to the vendor or the customer to get the information about the credit given for the loan and the detailed structure of the amount recorded. In the QuickBooks desktop version, the line of credit is predefined to the user or vendors. while the transaction is processed it is always reflected in the line of credit if it is added to the credit.
We can reconcile the line of credit by checking the previous transactions of the customer or the vendor if it has food or past experiences according to the past line of credit given it will reconcile. If you have a problem recording Quickbooks payments then we can help you out.
How to Set Up Line of Credit in Quickbooks?
Journal entries are also pointed in the line of credit in the other part of it. This means a line of credit will always calculate and keep the owner aware of the credit given and how much more can be used. But if a line of credit crosses the budget then also it will be given but will be added for the next payment or transactions.
When an account is created for the vendor or customers they always have the option of taking the loan to keep a specific amount in the line of credit in QuickBooks this amount is managed by QuickBooks with the help of a line of credit to have all the related information regarding the payment and transactions to the line of credit.
When a chart is made for all the accounts line of credit gives the benefit to the previous account holders by giving them the loan of their order amount and details are stored with the line of credit in QuickBooks itself.
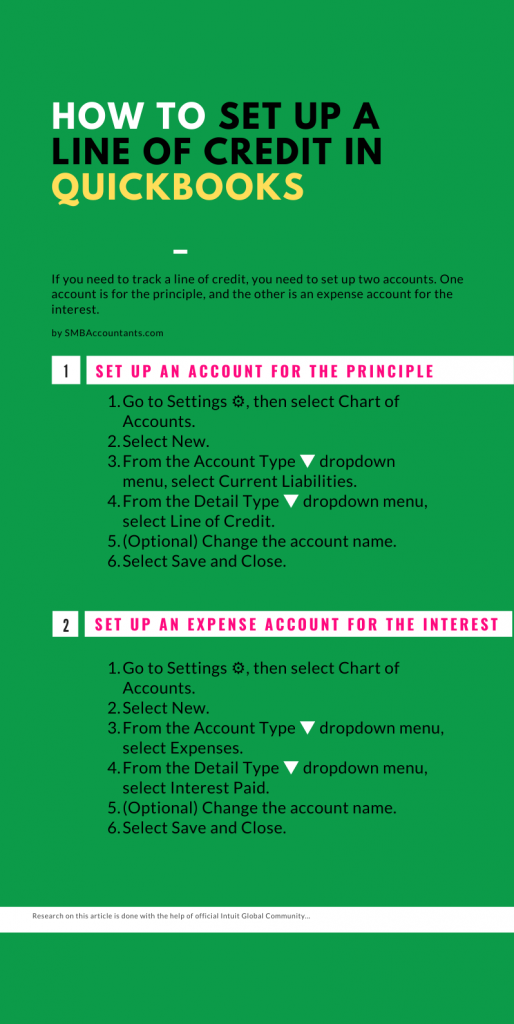
To set up a line of credit accounts you have to set up 2 accounts.
These two accounts are:-
- Principal account
- Expenses account for interest
These accounts are also used for tracking the line of credit in QuickBooks.
Follow the below instructions:
- Discover the Settings option.
- Click on the Chart of Accounts button.
- Hit on the New tab.
- Now locate the dropdown menu named Account Type.
- After this discover the dropdown button which says detail type.
- Choose the Line of Credit option.
- Modify the account name.
- Hit on the Save and Close button.
- Give a click on the Yes option if you double-checked the date of the transaction.
- Click on the Settings option and then choose Chart of Accounts.
- Hit the New button.
- Discover the dropdown menu that says Account Type.
- Hit on Expenses.
- Locate the Detail type dropdown option.
- After this, you have to choose Interest Paid.
- Alter the name of the account.
- Choose the Save and Choose button.
How to Export QuickBooks Customer List in Just 7 Easy Steps?
How to Line of Credit in QuickBooks?
Follow the step by step method:
- Click on the (+) plus icon, and click on Bank Deposits.
- Now, make sure that you deposit the proper deposit of the account.
- Now, to add funds in the deposit section, scroll down to the bottom of the screen.
- Now, add other funds in the deposit section and then scroll down to the bottom of the screen.
- Now, click on the credit card account from the drop-down menu that you have just made.
- Now, enter the deposited amount into your bank account.
- Click on save.
- Click on the (+) plus icon, and click on Expense.
- Now, make your payment method a credit card.
- Now, go to the top left side of the monitor, and click on Line of Credit card.
- Now, select the financial institution name which is at the top left of the monitor.
- Now, click on the payee field.
- Now, click on the interest expense account from the Account drop-down list and then enter the amount of the interest charged.
- Click on Save.
- Go to the navigation menu which is on the left, click on expanses, and then click on vendors.
- Now, click on the vendor's/supplier's name.
- In the bill, click on the make payment option to record the payment.
- Now, click on the LOC credit card account, and click on the drop-down list of payment accounts.
- Enter payment details and then click on the save.
How to Record a Payment Amount to Your Line of Credit in QuickBooks?
You can easily track all the payments which occur in the bank or on a line of credit. Follow the below information to record the payment on the credit card.
- Locate the +New option.
- After this discover the below suppliers.
- Hit on the Check button.
- Discover the payee field to choose or fill in the financial institution name.
- Go to the Bank Account field.
- Choose the bank listed in the drop-down list.
- Discover the Category details tab, and choose a line of credit from the field named Category Type.
- Fill in the amount.
- you need to pay down the principal.
- Now again click on the category details option.
- Choose Interest paid from the field named Category.
- Write the amount you need to pay down the interest.
- Hit on the Save option.
- Click on the Yes button in case you have double-checked the date.
In case you are making a payment to the bank via credit card or debit, you can easily record the repayment via expense or label the expense. Moreover, you can categorize the expense according to interest and principal.
How to Organize Bill Payments when funds go directly from the line of credit to the vendor as an Accounts Payable bill?
Here are the steps you have to follow:
- Locate Home Page Screen.
- Choose Create +Sign.
- Hit on Bill under the Vendors header.
- Hit on Vendor.
- Select Date.
- Below the Accounts Details column, you have to click on Account = Purchases Expenses account.
- Fill in the amount.
- Hit on the Save and Close option.
- It will create an Accounts Payable balance.
- Open the Home page screen.
- Hit on Create + icon.
- Click on the Journal entry below other.
- Fill the date.
- Now locate the initial line hit on the drop-down arrow named account and then choose Accounts Payable.
- Now locate below the Debit column and fill in the amount you have paid to the vendor.
- Write a memo.
- Below the Name option hit on the drop-down arrow and then choose the vendor you have done the payment.
- Now discover the second line below the name section hit the drop-down named Account and then choose the line of credit account.
- Fill in the amount you have done the payment to the vendor below the credit column.
- Write a memo and then hit on the Save and Close button.
- Open the Home page window.
- Choose Create + Sign.
- Click on Pay Bills below the Vendors header.
- Below pay to the order of, and choose the name of the vendor.
- Now below choose an account for the bank you have to choose a Bank clearing Account you can also add a new account if required. This account will always contain a a zero balance.
- The window will refresh and then it will display a matching amount below the Credit and Bill Payment information.
- Hit on the checkboxes to match the amounts.
- You have to clear the amount field zero.
- After this hit on the Save and close option.
We are a very authentic and genuine third-party service provider of QuickBooks. You can get in touch with us via Live Chat Support which is available on our website. You can also call us on our Toll-Free Number smbaccountants.com to get your resolution sorted out in no time. If your credit card is not processing with Quickbooks then you can contact us and we will help you out.
FAQs
How does the line of credit work in QuickBooks?
Line of credit is almost identical to the process of bank loans i.e. It allows for a certain amount of funds that can be used as needed.
How do I set up the line of credit in QuickBooks?
The line of credit can be tracked by setting up two accounts i.e. One account is for the interest an expense account and the other account is for the principal.
How do we track the line of credits in QuickBooks?
Through QuickBooks online, payments on a credit line can be tracked. Credit card payment records allow detailed financial-based reports to be preserved. You can do it if you want to transfer credit funds into another account.


