
In this article, we will cover what QuickBooks error 6000 83 entails, the reasons for its occurrence, and how to fix it successfully. Within the accounting domain, QuickBooks has emerged as an exceptionally well-received application. Armed with an extensive array of tools and functionalities, QuickBooks has notably simplified the task of upholding financial records for businesses. Despite its commendable attributes, occasional instances arise wherein minor hiccups in the application impede the seamless productivity of these enterprises.
QuickBooks Error Code 6000 83 surfaces when a user attempts to initiate the opening or restoration process for a company file. This issue is predominantly triggered by either an inaccurately designated file name or corruption within the file itself. Below, you will find a comprehensive elucidation of this error, coupled with effective methodologies to address and resolve it. Kindly review the following information.
What is QuickBooks Error Code 6000 83 & How to Fix It?
Encountering QuickBooks Error Code 6000 83 can disrupt the process of accessing or restoring data files. Commonly referred to as a company file error, this glitch might also surface when users attempt to create backups for their company files. The root causes of this issue include misconfigured hosting settings and the presence of damaged company or backup files. The error typically emerges with a warning message stating, "An error occurred when QuickBooks tried to access the company file," clearly indicating a breakdown in communication between QuickBooks and the server device.
QuickBooks Error Codes -6000 83 might arise due to diverse factors. These possible causes include:
- Non-Compatible Windows Version: This error can manifest when utilizing a version of Windows that is not tailored for U.S. or Canadian usage.
- Regional Language Settings: The error may emerge if your Windows system's 'Regional Language Settings' are configured in a language other than English.
- Incorrect File Extension: The error can occur if the file extension of the QuickBooks company file needs to be revised.
- Incomplete QuickBooks Installation: This error can arise when QuickBooks is not fully installed or installed improperly.
- Insufficient Network Access: If there's inadequate access to the network server, QBDataServiceUserXX, or Windows admins, the error may appear.
- Damaged Company File: A damaged or corrupted company (.qbw) file can lead to this error.
- Damaged Shared Folder: The error might occur if the shared folder containing QuickBooks files is damaged or corrupted.
- Multiple Systems Hosting: The error can emerge when multiple systems simultaneously attempt to host the same QB Company file.
- Converting Over Network: Converting a QB Company file from an earlier version over a network may trigger the error.
- Incorrect File Extensions: The error might result from file extensions being in formats like .qbm or .qbw.adr instead of the correct format.
- Incorrect Hosting Configuration: The error can arise if hosting is enabled on servers and a workstation rather than just on the server.
- Linux Server Issues: The absence of the qbdir.dat file or inadequate monitoring by qbmonitor can lead to errors on Linux servers.
- Server Name Unpingable: The error may occur if the machine cannot ping the server's name.
Important Indicators of QuickBooks Error 6000, 83 You Shouldn't Overlook
Pay close awareness to these indicators, which can help you identify the presence of the error within your software:
- Deterioration in QB performance, possibly leading to complete task failure.
- Unresponsiveness to keyboard inputs or mouse clicks within the application.
- Unexpected shutdowns of QuickBooks or Windows during task execution.
- Happening of a blank or deformed gray screen.
- The tabs or buttons in QB Desktop might appear faded or unclickable.
Situation 1- Issue Encountered during Data File Backup Creation
Should you encounter an error while attempting to initiate a backup of your data files, consider trying the following solution:
- Access the computer hosting your company's data file (the server computer).
- In the QuickBooks screen, navigate to the File tab, and opt to exit QuickBooks Desktop.
- Double-click the This PC icon on your desktop's home screen. Proceed to access the C: drive.
- Within this drive, initiate a right-click and opt to create a New Folder. Designate the name of this folder as "QB Test."
- Your next step involves using QuickBooks to back up your company's data file. When prompted to select a storage location for the backup, choose the recently created "QB Test" folder.
- Proceed to restore the backup of your company's file. This will allow you to ascertain whether the error has been rectified.
- Consider using this backup as your primary company file if the error no longer manifests. To prevent confusion and accidental overwriting, it is advisable to rename the previous company file.
Situation 2 – Encounter of QB Error Code 6000 83 During Data File Restoration
An often-encountered scenario involves the emergence of error code 6000 83 while attempting to restore a backup file. Examining the backup file's name and the associated file folder's name is crucial, as these factors can render the file inaccessible. Follow these steps for resolution:
- Initiate the process by clicking the Windows icon, unveiling the Start menu.
- Proceed to the search panel and input "File Explorer," then execute a double-click to launch the Explorer window.
- Navigate to the directory where your QuickBooks (QB) files are housed, and pinpoint the backup file named "company_file.qbb."
- Employ a right-click on the file and opt for the "Rename" feature from the presented choices.
- Scrutinize the backup file's name, ensuring the absence of any extraneous white spaces or special characters that could impede accessibility. Eliminate any prohibited symbols from the title.
- Similarly, right-click on the folder containing these files, and trigger the "Rename" action.
- Redo the previously outlined steps, meticulously examining the presence of unwanted white spaces, special characters, or symbols.
- Subsequently, conclude by closing the Explorer window and initiating a device reboot.
- Now, you can restore the QuickBooks company file backup.
Situation 3 – Enhanced Susceptibility to Errors When Storing Files on a Windows Server
When a company file or its backup is stored on a server, the likelihood of encountering issues increases. To rectify this problem, you can resolve it by reviewing the hosting settings across all your devices. Follow these steps:
- Access QuickBooks from one of the workstations within your network.
- Navigate to the File menu tab.
- Scroll down to the Utility option and proceed:
- If the "Host Multi-User Access" option is present, disregard it.
- If the chance "Stop Hosting Multi-User Access" is available, select it.
- Next, open QuickBooks on your host device.
- Tap on the File menu.
- Click on Utilities and perform the following check:
- Click on "Host Multi-User Access."
- Open the menu again and choose the "Stop Hosting Multi-User Access" option.
- Repeat the process and select "Host Multi-User Access" to reset the multi-user mode.
Situation 4: Resolving Errors Caused by Third-Party Permissions Manually
If you encounter difficulties stemming from antivirus settings, you can apply the subsequent steps to address the situation:
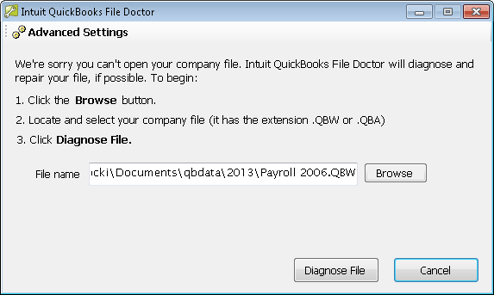
1. Utilize QuickBooks File Doctor to Identify and Rectify Errors
QuickBooks File Doctor serves as a valuable solution for tackling issues related to company files or network problems. To employ this tool, follow these steps:
- Obtain the tool from official sources.
- Complete the installation procedure by adhering to the on-screen instructions.
- Launch the tool on your system.
The tool will conduct a complete can to identify server errors and will proceed to resolve them automatically. Once the process is entire, restart your computer to ensure the successful implementation of the changes.
2. Perform QuickBooks Update to the Latest Version:
One alternative method involves updating QuickBooks to its most recent version to resolve any existing errors.
Configure Antivirus or Firewall Settings for QuickBooks:
Intuit does not support firewall-related problems. The following steps outline this procedure:
- Review your Firewall Configuration to allow QuickBooks Desktop updates and internet security settings. This helps in verifying network problems and exceptions.
- Visit the website of the firewall manufacturer and adhere to the system-specific instructions for configuring the firewall.
- Ensure that QuickBooks files grant internet access on all machines.
3. Verify Access Permissions for QB Company File Access
To ensure efficient accessibility to QB company files, having suitable permissions in place is crucial. Follow these steps to ensure the setup:
- Navigate to the setup folder and review file permissions to share QB company files, ensuring the proper configuration.
- Utilize the 'Set Windows' option to establish permission for sharing company files.
Steps to Resolve QuickBooks Error Code 6000, 83:
The steps for troubleshooting this error are contingent upon the specific action taken when the error occurred. Please choose from the scenarios provided below and follow the recommended troubleshooting steps:
Scenario 1: Accessing the QuickBooks Company File on a Windows Server
If you encounter this error while working with the QuickBooks company file on a Windows Server, you might discover that copying the QB company file to your computer for error resolution is a more effective approach than resolving it over the network. After resolving the issue, you can then copy the QB file back to its original network location.
Solution 1: Utilize QuickBooks File Doctor for Error Resolution
- Begin by obtaining the tool from this source, then proceed to install and execute it on your system.
- The tool will systematically scan and automatically rectify server errors.
- Upon completion, simply reboot your computer system.
Solution 2: Disabling Hosting on Network-Accessible Workstations
If you utilize QuickBooks Desktop on multiple computers, designate just one as the host for the QB company file. Implement the steps below to deactivate hosting on all other workstations
- Launch QuickBooks Desktop.
- Click on the "File" icon, then navigate to the "Utilities" tab.
- Review the options:
- If you encounter "Host Multi-User Access," it signifies that the computer isn't hosting the QB company file. Proceed to the next workstation.
- If you come across "Stop Hosting Multi-User Access," select this option and then:
- Within the "Stop hosting multi-user Access" window, confirm by clicking the "Yes" button.
- In the subsequent "Company file must be closed" window, click "Yes" to proceed. Now you can move on to the next computer.
Solution 3: Manual Resolution for Error 6000, 83
If the QuickBooks File Doctor is unable to run successfully on your system, you can follow these manual troubleshooting steps. In the event that you prefer a hands-on approach, consider implementing the following solutions:
- Update QuickBooks: Ensure you have the latest QuickBooks release installed. Keeping your software up-to-date can often resolve various issues.
- Configure Firewall and Anti-virus: Please note that Intuit does not provide support for firewall-related problems. However, you can configure your firewall and internet security settings to allow QuickBooks Desktop updates and network access. Consult your firewall manufacturer's website for instructions on permitting internet access to QuickBooks files across all devices.
- Verify Company File Access Permissions: To ensure proper permissions are in place, review the setup folder(s) and file(s) permissions for sharing QuickBooks company files. If you need to adjust permissions, refer to the guidelines on setting Windows access permissions for sharing QB company files.
Scan the QuickBooks company files
By examining the designated folders where these files are stored. This action creates 'Network Descriptor' files with the *.nd extension. These files store information about the hosting machine. Begin by clicking on the "Windows" or "Start" menu. Navigate to the "Programs" section and select 'QuickBooks.' Then, access the QuickBooks Database Server Manager (QBDSM).
- Find the "Add Folder" option in the QuickBooks Database Server Manager. Use this to locate and include folders that contain QuickBooks company files (QB files). Once all relevant folders are added, initiate the scanning process by selecting the "Scan" icon.
- You will find the data files under the "QuickBooks Company Files" section. Visit each folder that holds QB company files. Ensure the .qbw and .nd files are created for each QB company data file.
Verify Hosting on Computers:
If you're employing the QuickBooks Database Server Manager (QBDSM) on the server within a network environment, the server computer should be the sole machine with hosting activated. Enable hosting on the server computer and scan QB company files.
To do this, launch the QuickBooks application. Proceed to the "File" menu and choose the "Utilities" tab. From the provided list, note the following:
- Host Multi-User Access indicates that the machine isn't hosting the QB company file. Move on to the next machine.
- Stop Hosting Multi-User Access: Select this option. On the 'Stop hosting multi-user Access' screen, confirm by clicking "Yes." Close the company file window and respond "Yes" to continue. Proceed to the next computer as needed.
Server
Click on the "Taskbar" window and select the "Task Manager" tab. Navigate to the 'Image Name' column and search for QBDBMgrN.exe. To organize the list alphabetically, click on the column heading. If QBDBMgrN.exe is not visible in the list, ensure that the QuickBooksXX service is present on the computer and running. Log into the system as a Full Administrator (Contact the administrator for full admin access if needed).
Click on the "Start" or "Windows" button and then select the "Run" option. In the "Open" field, type in "services.msc" and click on "OK." Locate the appropriate service for your QuickBooks Desktop version from the list below:
- QuickBooks version 2020: QuickBooksDB30
- QuickBooks 2019: QuickBooksDB29
- QuickBooks version 2018: QuickBooksDB28
- QuickBooks 2017: QuickBooksDB27
- QuickBooks version 2016: QuickBooksDB26
Ensure that you select "Automatic" as the startup type and confirm that the service is currently running. If the service is not running, right-click on it and choose "Start." Double-click on the service if the startup type is not set to Automatic. In the Startup type drop-down, select the "Automatic" option.
- Review the QBDBMgrN.exe file entries in a sequence and verify the accuracy of the entries in the "User Name" column:
- Review the QBDBMgrN.exe file entries in a sequence and verify the accuracy of the entries in the "User Name" column:
Accessing the QB company file from a different location involves the following steps:
- Utilize the host computer to initiate the opening/accessing of the QB file.
- Navigate to the machine where the QB company file is stored initially.
- If the hosting computer exclusively contains the Server installation and storage, opt for the 'Copy file' function to relocate the file to another location.
- Launch the QuickBooks Desktop application and open the QB Company file displaying the error warning.
- If opening the QB company file from this machine succeeds, scrutinize the file for issues.
- If unable to open the QB company file, proceed to step B.
- If prompted by QuickBooks to rebuild the QB company file, follow the instructions accordingly.
- Note: Should the QuickBooks Desktop application confirm the absence of problems with the QB company file but the error or issue persists, advance to Step B.
- Duplicate the QB file to a Different location.
- Navigate to the folder containing the QB company file.
- Right-click on the 'filename' and select the "Copy" option.
- Then, right-click on an empty area of the desktop screen and choose "Paste."
- Launch the QuickBooks Desktop application and open the QB company file from the desktop. Please be aware that if you encounter a QB error warning message, it could indicate file corruption. In such a scenario, you have three choices:
- Restore the backup of the QB company file.
- Retrieve lost QB data using 'QuickBooks Auto Data Recovery.'
- Forward the QuickBooks company file to the QuickBooks Data Recovery Team.
- You must contact technical support to avail of the QB data recovery service from official Intuit Data Services. (Charges may be applicable.)
- If the QuickBooks company file opens without issues, copy the QB file(s) back to its original location.
- Important Note: Before proceeding, ensure that you rename the original QB Company file to a different name. This should be done before copying the freshly opened file from the computer. Be cautious not to overwrite the existing QuickBooks company file with the new one. Follow these steps:
- Access the folder(s) containing the original (damaged) QB company file.
- Rename the file by adding either "OLD" or "DAMAGED" at the beginning of the file name. For example, if the original QB company file was named 'CompanyFile', rename it to 'OLD_CompanyFile' or 'DAMAGED_CompanyFile'.
- Close the QuickBooks application.
- Copy the QB company file(s) from the computer.
- Paste the copied file(s) into the folder where the file was originally saved or stored.
- Open the QuickBooks application.
- Access the QB company file from its initial location.
Following these steps, you can safely preserve the original file while working with the new one and prevent accidental overwriting.
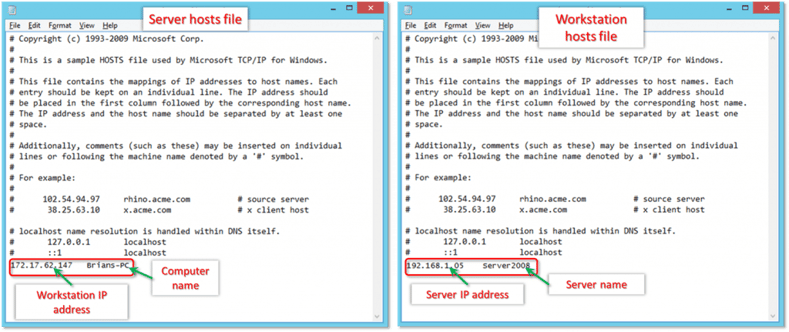
Solution 4: Modifying the Hosts File
To address the issue, you can edit the Windows hosts file(s) on your desktop computer with the accurate IP address and Windows Server name. It's important to note that host files mainly handle static IP addresses. If your network employs dynamic addressing, this approach could lead to problems if the server reboots and obtains a different IP address than what's configured in the Hosts file. To prevent this, ensure the Windows server maintains a consistent address on the network.
Follow these steps:
- Close QuickBooks Desktop if it's open.
- Begin by accessing the Start menu and opening "Computer" on the server.
- Navigate to the following paths, one at a time:
- C:\Windows\System32\Drivers\Etc
- C:\Windows\Syswow64\Drivers\Etc
- In these locations, locate the host's file and double-click it.
- If prompted to choose a program to open the file, select "Notepad."
- Enter the IP address followed by the computer name. For the server, use the workstation's IP address and computer name, and for the workstation, use the server's IP address and computer name.
- While entering these details, utilize the Tab key to separate the IP address and computer name instead of the space bar.
By correctly updating the hosts' file, you can establish the necessary IP address and server name associations. Keep in mind the static vs. dynamic IP addressing considerations to avoid any potential issues.
Condition 2: Access the QuickBooks Company file located on a Linux server.
Important Points to Keep in Mind: The resolution outlined below for addressing (QuickBooks Error 6000 83) should be executed by a proficient system administrator well-versed in navigating the Linux operating system. Furthermore, the administrator should possess a comprehensive understanding of network operations and the necessary permissions to ensure accurate installation during the configuration of QuickBooks Enterprise Solution Linux Database Server Manager.
Solution 1: Verifying Connection
To ensure proper connectivity, follow these steps:
- Configure the 'Initord.conf' File on the Linux Database Server Manager to specify the appropriate directory.
- Restart the QuickBooks Enterprise Solutions application on the Windows client machine.
- Ping the server:
- Press the "Windows+R" keys simultaneously to open the 'Run' window.
- Type "CMD" and click "OK" to access the command prompt.
- In the command prompt, type "Ping (Name of Linux Server)" and press "Enter".
Solution 2: Modifying the Hosts File for Linux Server Connection
To address the issue, you can follow these steps to edit the hosts file and ensure proper access to the QB Company file from a Windows client while considering the case-sensitive nature of the Linux file system:
- Close the QuickBooks Desktop application.
- Press the "Windows" and "E" keys simultaneously to open the 'Computer' window.
- Navigate to the Local Disk (usually 'C:').
- Go to the 'Windows' folder icon, then access the 'System32 folder' and subsequently the 'drivers folder'.
- Locate and open the 'etc' folder.
- Use 'Notepad' to open the 'hosts' file.
- Find the last listed IP address in the file and either edit or add the IP address of the server.
- Press the "Tab" key and enter the Linux server name.
- Save the changes to the hosts' file. 10. Now you can launch QuickBooks and open the QB company file.
By following these steps, you'll ensure the correct case sensitivity while specifying the QB Company file name, and you'll be able to access the file smoothly through the Windows client after editing the host's file with the appropriate IP address and server name.
Condition 3: In the event that you are in the process of creating a backup, please follow these steps:
- Generate a fresh file folder at the root directory of the C drive.
- Assemble a manual backup of the required files and store it within the newly created folder.
- For a more comprehensive understanding of the backup process, you can refer to the QuickBooks Company file backup instructions. If you are using the QuickBooks application, access the Help window by pressing the "F1" key. In the Help window, search for 'Back up Company Files Overview'.
- An alternative method involves copying the QB company file to a Windows PC and utilizing the 'QuickBooks File Doctor', as elaborated in the 'Windows' section.
Condition 4: Resolving QuickBooks Error 6000 83 through Company File Restoration
An effective approach to tackle QuickBooks Error 6000 83 is to restore the QuickBooks company data file. Here's a recommended solution:
Solution 1: Adjusting the QuickBooks File Extension
When attempting to restore a QuickBooks (QB) company file, it generates a QB company file with a ".qbw" extension as a suffix. However, if the backup process generates a QB file with either a ".qbm" or ".adr" extension, the following steps should be taken to rectify the situation:
1. Rename the QB File Extension:
- In order to open/access the renamed QB file, change the QuickBooks file extension from ".qbm" or ".adr" to ".qbw".
- Example: Rename "My Company Name.qbm" to "My Company Name.qbw".
- If necessary, adjust Windows settings to display QB file extensions.
2. Obtain File Location:
- Open the QuickBooks Company file and press the "F2" key to access the Product Information screen.
- In the "Location" section under "File Information," copy the file location and paste it in a system notepad.
3. Multi-User Environment Consideration:
- If operating in a QB multi-user environment, close the QuickBooks application on all computers using the QB Company file(s).
4. Navigate to the File:
- Right-click on the "Windows" or "Start" icon and select the "Explore" option.
- Locate the QB company file location noted in step 2.
5. Rename the File:
- Right-click on the "File Name" and choose "Rename."
- Enter the new QB company file name and press "Enter."
Note: When prompted to confirm the QB file renaming, ensure that the new QuickBooks filename is accurately typed and saved.
6. Confirmation:
- Click "Yes" to confirm the renaming of the QB file
By following these steps, you should be able to resolve QuickBooks Error 6000 83 by correctly restoring the QuickBooks company data file and adjusting the file extension if necessary.
Solution 2: Troubleshooting QB File Name and Path Issues
When performing a backup restoration in QuickBooks, it's crucial to address any problems related to the QuickBooks file name and file path. To ensure a smooth process, steer clear of excessively long paths and special characters. Here's a breakdown of acceptable and unacceptable practices:
- Acceptable Path: C:\Users\Fred\My Documents\QuickBooks data\Company Name.qbw
- Unacceptable Path: Business\Fred\Fred’s Documents\My Business $.Business - In the unacceptable example, both the usage of the quotation mark ('') and the dollar sign ($) as special characters is problematic. To rectify this, make sure to rename both the "Fred’s Documents" folder and the "My Business $.qbw" file.
Additional Considerations:
- If you intend to restore a backup to a network location, start by restoring it to your local computer first.
- Once the backup has been successfully restored on your computer, you can then proceed to copy the restored file to the desired network location.
- Follow these steps to restore your backup:
- Access the "File" menu and select the "Open or Restore Company" option.
- Opt for "Restore a backup copy" and click on "Next."
- Choose the "Local backup" alternative and proceed to the next step.
- Browse for the backup QuickBooks file named [Companyname].qbb and select "Open."
- On the "Open and Restore a Company" screen, click "Next."
- Navigate to the "Save Company File" screen. Make sure to remove any special characters or spaces from the "File Name" section.
- Select the "Save" option to complete the process.
By complying with these guidelines and best practices, you'll ensure a seamless backup restoration process and mitigate any potential file name or path-related issues in QuickBooks.
Need Professional Help?
As there is more than one reason that is causing the error to happen, thus we would request you to give us a call at our QuickBooks pro advisor tech support phone number at smbaccountants.com and get all your queries resolved.
Frequently Asked Questions
Why does QuickBooks error code 6000 83 occur?
It can be caused due to numerous reasons including:
Incorrect file extension
- Incomplete installation of QuickBooks Desktop.
- Windows firewall or your browser might be blocking your company files.
- More than one user attempting to access the data file.
- Antivirus restricting the access to QBDataServiceUser.
- Due to network connectivity issues, you are not able to connect with the server hosting the company file.
How to identify QuickBooks error code 6000 83?
Many signs and symptoms can help to know behind the occurrence of error code 6000 83:
- Windows starts running sluggishly.
- Also, respond slowly to the command that you give to the keyboard or mouse.
- Your system starts to freeze for a few seconds.
- When the error pops up on your screen and at the same time your active Windows crashes.
How do we rectify QuickBooks error code 6000 83?
You can easily rectify this error by applying any of the following solutions that are jotted down:
- Review your backup filename.
- Restore your backup file from your local hard drive.
- Create a portable company file.
- Manually configure Windows Security applications.
- Download and run QuickBooks File Doctor.
- You can also run QuickBooks Database Server Manager.
- If you’re using an outdated version then it is required to update the latest updates of QuickBooks Desktop software.