Although QuickBooks is a great accounting and bookkeeping program, occasionally errors and issues arise. One common error QB users have discovered in their Event Viewer is QuickBooks unexpected error 5. It may appear as “An unexpected error has occurred in “QuickBooks: Got unexpected error 5 in a call to NetShareGetInfo for path \\%filepath%.” You may see it alone or with several other errors, depending on your problem.
Further, it impacts several QuickBooks operations like backing up files, opening them, or working on them. You may encounter crashes due to this error. Since it becomes challenging not being able to complete your QuickBooks operations, we suggest you read our comprehensive blog and resolve the problem quickly.
It is quite likely that you may experience an identical situation. Hence, read this article to face a similar situation and clear out any possibility concerning QuickBooks Unexpected error code 5.
What is QuickBooks Unexpected Error 5?
QuickBooks unexpected error 5 appears when you attempt to access the company file and are unable to enter the file location. This indicates that you are not authorized to view the company file that is kept at a certain location. When you are prohibited from accessing the file location, this may occur.
The error appears with a message, QuickBooks unexpected error code 5: got unexpected error 5 QuickBooks in a call to NetShareGetInfo for path\\server\file.QBW”.
An issue such as this can occur because of possible causes like misconfigured settings. An unexpected issue, as experts state, is a sign that the application has experienced a fatal issue. But, even though it is unexpected, it can be fixed with the help of certain instructions very accurately and carefully.
Easy Migration of QuickBooks Enterprise to QuickBooks Online
What are the Causes behind the occurrence of the QuickBooks Unexpected Error 5?
If you have experienced unexpected error 5 QuickBooks, it can be due to the following reasons:
- The system is impacted by a malicious attack or virus attack.
- Damaged or corrupted Windows registry entries.
- Windows components are absent, such as necessary software, files, hardware, etc.
- QuickBooks installation is not complete or incorrect.
- The system was not shut down in the right manner.
- The internet connection is poor, leading to breakage.
- Missing or incomplete window registries.
- The Windows account that is being operated lacks adequate authorization.
- POS update location is not valid or right.
- You are using an old version of QuickBooks.
How to Import Excel Journal Entries into QuickBooks? [Solved]
How to fix the QuickBooks Unexpected Error 5?
Now that you are aware of the primary causes of the error, it may be easy for you to resolve the issue. You know the place from where it originated, and hence, you can delete the error from the very cause directly. It means you are not required to execute a hit-and-trial method to delete the issue. It not only saves time and effort but also makes the troubleshooting procedure very smooth.
Solution 1: Offer File Access
QuickBooks Unexpected error 5 occurs when you lack access to the option of file sharing. You can delete this issue by:
- Launch the file explorer.
- Find the folder that has the company file.
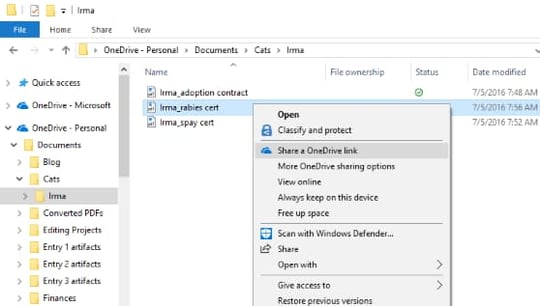
- Press right-click on it and then navigate to the Properties option.
- Choose the Sharing tab option.
- Choose the Sharing tab option.
- Click Apply and then press OK to save the changes.
Solution 2: Turn off UAC
User account control offers security by performing the required changes in the computer to keep away any threats to it. But, it can be the cause of why you witnessed unexpected error 5 QuickBooks. Hence, shut it to fix the related issue:
- Open the Control Panel via the Start menu.
- Navigate to the User Account option.
- Choose Change user account control settings. Now click Yes.
- You will see a slider. You need to drag it down to never notify.
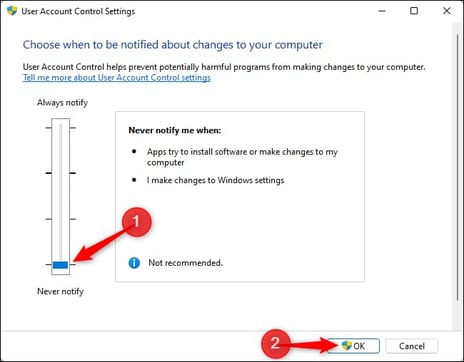
- Lastly, click Okay.
- In case the error is fixed, navigate back and then switch UAC on, it safeguards the system.
Solution 3: Remove and Create a User Again
When you erase a user and then recreate the user, it resets all other changes made or the settings. Not to mention, it makes the user account new and free of any errors.
Delete the user account:
- Open QuickBooks.
- Now navigate to the Company Section.
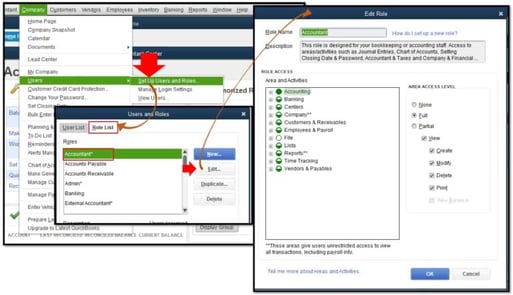
- Press on Users.
- Select Set Up Users and Roles.
- You will get a list of all the users. Now choose the user you wish to delete.
- Press Delete and confirm.
Recreate user profile:
- Navigate to the Users and Roles tab.
- Select New and type the right username for the particular new user.
- Provide a new and secure password.
- After it is complete, add roles for the newly created user profile.
- Press OK.
Solution 4: Uninstall QuickBooks and then Reinstall QuickBooks
The online accounting program, QuickBooks, is known for having flaws and faults, such as QuickBooks Unexpected Error Code 5. Reinstalling the software after deleting it will easily remove these. Prior to doing this, make sure you have the product and license number on hand. Once the application is reinstalled, you will be required it to log in.
- Click Windows + R to open the particular Run command.
- Enter appwiz.CPL in the field.
- Find QuickBooks and press right on it.
- Click Uninstall. Make sure you do the same for all the files concerning the software.
- Next, navigate to the official Intuit website.
- Now Download QuickBooks and then sign in with the product and license number together with other details.
Solution 5: Download QB POS's latest updates
When you use an old QuickBooks version, you come witness many issues like QuickBooks unexpected error 5. It is important to update the application by implementing the steps given below:
- Operate POS with admin credentials.
- Now open the Help menu. Now choose the option software update.
- Select the update preference.
- Next, in the tab for general, click on the option, Automatically Download Updates.
- Click Okay.
Solution 6: Run the File Doctor
QuickBooks File Doctor is a tool that authenticates the damages and repairs them with the help of some clicks, smoothly.
- Begin by downloading QuickBooks Tool Hub from the official Intuit website.
- Now install the QuickBooks application with the help of the instructions presented on-screen.
- Post this, open the software, and navigate to the company file issues.
- Press on Run QuickBooks File Doctor.
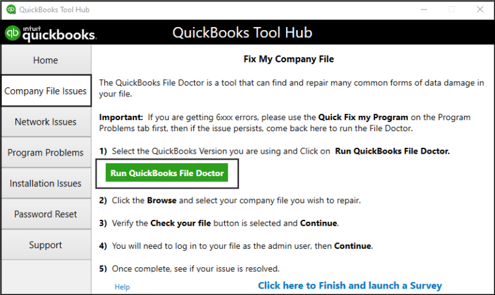
- The tool will begin scanning and repairing.
- It will take some time based on the size of your particular company file. Make sure you do not interfere.
Final Words
We understand the hesitation you feel when an error like QuickBooks unexpected error 5 appears and you are unsure of how to fix it. This is why, we present to you these straightforward and hassle-free solutions to fix problem 5.
Get in touch with the support staff if you require any additional help. Our specialists are at your disposal all day long.
Frequently Asked Questions
Q 1: What are the other reasons for unexpected error 5?
- The entries are invalid in the Windows registry.
- The shutdown of the system or application is not done properly.
- In the system, the malfunction of the operation.
- Get the unexpected error 5 in the call to netsharegetinfo for the path\\server\file.qbw in the QuickBooks account
Unexpected error happens in the Intuit QuickBooks Desktop Enterprise Solutions: Contractor 16.0”:V26.0D R3 (M=1066, L=335, C=249, V=0 (0))
Q 2: How to resolve a QuickBooks Desktop Error?
Ans: Desktop issues in QuickBooks are a common issue that users generally complain about. It is possible to fix it with the help of the steps given below:
- Run QuickBooks Tool Hub.
- Download the current version of QuickBooks.
- Update the Windows Operating System.
- Download the Diagnostic tool and install it.
- Manually change all settings and fix the issue.
Q 3: Why does this error happen?
The local administrator is not allowed to access the application so if they try to access it then it causes the error displayed on their screen. It also happens when there is a network problem between the users and the database file of QuickBooks.
Q 3: How to resolve error 15227 in QuickBooks?
QuickBooks error 15227 occurs because of issues in the components or the system. You may witness this issue when you are attempting to install updates for QuickBooks. Here are some of the troubleshooting ways to fix the error:
- Repair Windows registry entries.
- Updates QBs again.
- Uninstall and Reinstall QuickBooks.
- Restore the system.
Q 4: How to prevent QuickBooks from aborting?
Ans: QuickBooks abort error occurs when you fail to operate the software and it keeps freezing or crashing. Here are the steps to fix it:
- Run the QuickBooks Install Diagnostic tool.
- Turn off the firewall and Network Protection for some time.
- Alter the name of the QBWUSER.ini file.
- Now restore the company file backup.
- Make a new user as admin and then run QuickBooks in the new profile.
- Now install QuickBooks software again.
Q 4: Which QuickBooks version and Operating system is more likely to experience QuickBooks Unexpected error 5?
Ans: Here are QuickBooks editions that may experience unexpected error 5:
- QuickBooks Desktop 2022
- QuickBooks Pro 2020
- QB Pro 2021
- QB Pro 2018
- QuickBooks Enterprise 2022
- Windows 10 Pro
- QB Pro 2022
