How to Import And Export Data in QuickBooks Desktop
Learn How to Import or Export Your Data Files in QuickBooks Desktop
You've come to the right spot if you've been browsing the internet for information on how to import and export data from QuickBooks desktop. You may believe that the only way to obtain information is to start from scratch, but there is another interesting option: you can move data to and from QuickBooks. This method can help you convert, upgrade, or create a new company file with ease, freeing up a significant amount of time for you to focus on other critical tasks. This article will discuss the fundamental procedures involved in importing and exporting data in QuickBooks. This is why make sure that you are connected with us till the end of the article, and do not miss out on any of the steps.
The Process to Import and Export Data: Brief Introduction
When we talk about importing data, we help in importing the bank transactions, accountant’s changes, general journal entries, and batch transactions. In addition to importing customers and vendors, you can also export them, as well as journal entries, customer and vendor lists, and more. Here, we’ll take a look at some lists and transaction types that you can import into QuickBooks.
What are the kinds of lists you can Import?
The list of data you can import is extensive. Here are the elements that you can import without any trouble:
- Charts of accounts
- Vendor types
- Employees
- Items
- Shipping methods
- To dos
- Notes
- Sales tax codes
- Customers and customer: jobs
- Other names
- Classes
- Payment terms
- Customer messages
- Sales reports
- Vendors
- Budgets
- Payment methods
- Customer and job types
- Price levels
What are the Transactions That Can Be Imported?
Now let us discuss the transactions that can be imported. Transactions that are possible to import:
- Account beginning balances
- Cash sales to customers
- Checks
- Deposits
- Invoices
- Account transfers of funds
- Vendor bills
- Estimates
- Payments from customers
- Vendor bills refunds
- Purchase orders
- General journal entries
- Credit memos to customers
- Credit card refunds to customers
Here are some points that you need to remember before importing and exporting in QuickBooks Desktop:
Consider the following when exporting and importing data in QuickBooks:
- Since imported data cannot be undone, you should safeguard your data files by creating a backup.
- Before importing the data, you ought to consult the accountant as well.
- Looking through the Intuit marketplace for programs that can help you import the data is another crucial step.
What is the process to Import and Export information with QuickBooks Desktop?
The process might be different depending upon what item there is to import and export, so we will be exploring the steps for different items one by one:
MS Excel
There are a few basic steps involved with importing data to MS Excel. QuickBooks opens an Excel spreadsheet in a formatted way, where you can enter the information. You can review results and view data in QuickBooks when you save and close your file. Now if you want to import customers, vendors, and products, the steps mentioned below are to be followed:
- Head to the File Menu, and then choose the utilities option.
- Select the import option.
- Now click on the Excel Files.
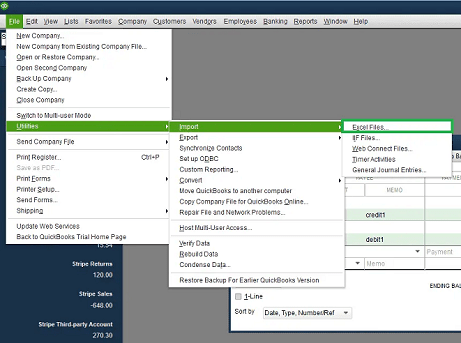
- You are supposed to hit NO, when the “Add or edit multiple list entries” window shows up on the screen.
- Follow the steps given below for importing the files:
- Select the Data Type.
- A prepared Excel Spreadsheet opens in QuickBooks. You will be able to Add My Data Now after you have finished entering the data, saving the file, and closing it.
- Review the results.
- View the data in QuickBooks.
- When finished, choose Close to put an end to it.
It should be noted that you may always return to this window choice if you need to import more customer, vendor, or item data from Excel using this option.
Using CSV File
To import a list in the given CSV format, you will need to install the QuickBooks Import Excel and CSV toolkit. This specific toolkit has the following components:
- Import from Excel and CSV Manual: It is a PDF with instructions, best practices, and notes.
- XLS Folder Name: This is a sample Excel file containing 4 worksheets, one constructed for each type of list.
- Allowed List: A reference guide that explains what fields are available for the Excel and CSV import.
- CSV examples folder: Sample CSV Files, one for each type of list.
For exporting the CSV Files, MS Excel is a necessity to be there. In case you do not have MS Excel installed on the system or if MS Excel is not installed on the system. If you would like to view and edit the data using a different format, please do so.
Customer and Vendors
- Open the Customer/Vendor Center.
- Click the Excel drop-down menu and select one of the following options:
- Export the vendor/customer list: This will export customer data such as name, balance, and contact details.
- Export transactions: This will export transactions for the selected customer or vendor.
- In the export box, select the Create a comma-separated values file option.
- Click the Export button.
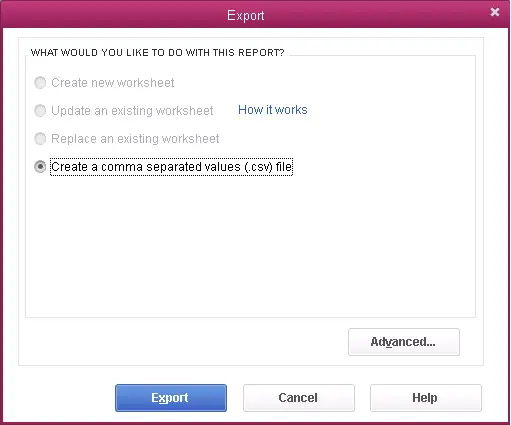
- Give the file a name now, and select the location where you want to save it.
- Moreover, find the file, open it, and edit it if necessary.
Reports
- For this, it is important to open the Report option.
- Now go for the Excel drop-down at the top of the report.
- Select the Create New Worksheet.
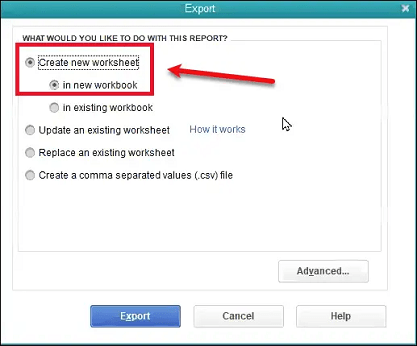
- Also, now opt for Create a comma-separated values file on the send report to Excel Window.
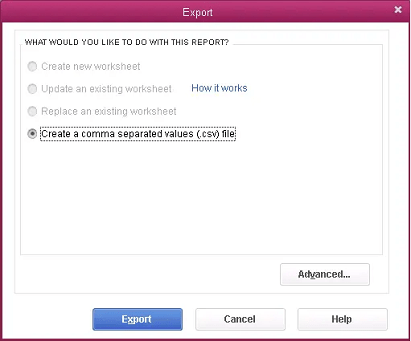
- After this, choose Export.
- Then, assign the file name and select the option for Location to save the file.
- You can locate, open, and edit the file as per the requirements.
Import and Export IIFs
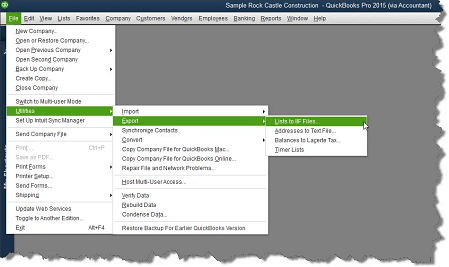
To export IIFs, perform these steps:
- First, sign in to the corporate file as an administrator.
- Proceed to the File menu after that.
- Select the Switch to single user mode option from the File menu.
- Instead, navigate to the File menu and select the Utilities tab.
- You must select Export to move on to the next step.
- Select the Export IIF files menu item.
- Next, you must select from the save selection where you want to save the IIF.
- Next, select Save and enter a name in the file menu.
- Selecting the OK button is the last step.
The Steps to Import
- As an administrator, Sign into the company file.
- Go to File.
- Now select “Switch to single-user mode.”
- Make a backup of the company file. This will allow you to restore it if the data does not import as expected.
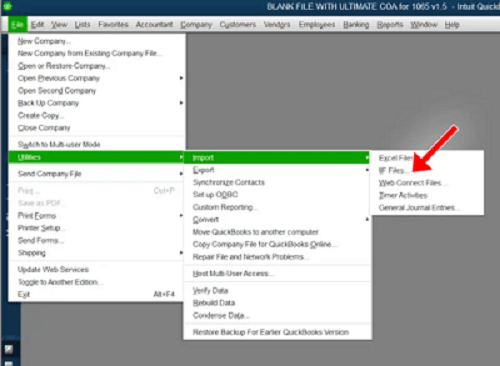
- Go to File, Utilities, and Import.
- Select Import IIF files.
- Browse to the IIF file, select it, and open it.
- Click OK to confirm the imported data.
Importing Batch Transactions From the Accountant
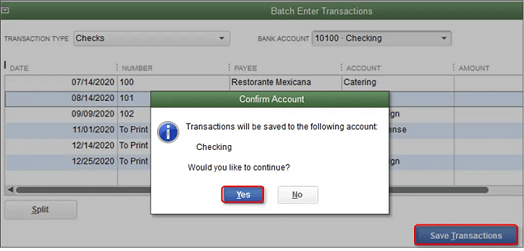
The process by which you import batch transactions from the accountant involves the steps given below:
- From the Accountant menu, select Batch Enter Transactions.
- In the Transaction Type drop-down list, select the type of transactions you want to enter.
- Select the appropriate bank/credit card or AR/AP account from the drop-down list. You can also select Add
- New to set up the account.
- Open the spreadsheet containing the transactions you want to enter.
- Arrange the columns in the spreadsheet to match the column order in the QuickBooks batch enter transactions screen.
- Copy the data from the spreadsheet and paste it into the QuickBooks batch enter transactions screen.
- Click Enter Transactions.
- Highlight the transactional information in the spreadsheet.
- Right-click the highlighted information and select Copy.
- Right-click the First Date field in the Batch enter transactions screen and select Paste.
- The information from the spreadsheet will now be displayed in the Batch enter transactions screen.
- Click Add all transactions.
- Click Save Transactions and select Yes to save.
- Click OK to finish the importing process.
It is important to note that batch transactions cannot be exported. However, you can copy multiple transactions from one company file to another in a form that can be imported using the Enter batch transactions feature.
Conclusion!
We hope this article was able to clear up your doubts about the Import and Export Data in QuickBooks Desktop. However, if you still find any problem in the given situation, we are here to assist you. At SMBaccountants, we have a professional team that is there to assist you 24/7.
Frequently Asked Questions
Can QuickBooks Desktop Import Data From Other Accounting Programs?
With the help of QuickBooks Desktop, you can import data from other accounting platforms. This can be done using Intuit's import tool or a few other third-party programs.
Is it possible to transfer and import data between QuickBooks Online and Desktop?
Indeed! Data export and import between QuickBooks Desktop and QuickBooks Online are simple to accomplish. You can utilize the integrated export and import features or other third-party solutions that make data conversion easier.
What type of data can I import and export in QuickBooks Desktop?
QuickBooks Desktop can import and export a variety of data types, including:
- Invoices
- Bank and credit card transactions
- Purchases
- Vendor and employee listings
- Ancillary data types