QuickBooks Clean Install tool is the most popular repairing tool used to recover the damage in the software. You need to reinstall the QuickBooks to fix the error after the un-installation process. This tool helps to perform a clean installation of QuickBooks.
Quickbooks_clean_install_tool.exe.
QuickBooks was launched in the year 1992 and developed with a motive to uplift small and medium-sized businesses by automating their daily accounting and financial tasks. This accounting software comprises eclectic features and advanced tools that simplify complex accounting, saving abundant time and enhancing work accuracy.
Like other software QuickBooks also encounters errors. There are unfavorable times when QuickBooks stops functioning due to technical or functional errors. To avoid these errors QuickBooks reinstallation is done with the help of a specially designed tool.
An Overview of the QuickBooks Clean Install Tool
The QuickBooks Desktop software is a versatile application that generates numerous files on your system, potentially overwhelming your computer's cache memory. The Clean Install tool is designed to thoroughly uninstall the program, addressing any associated issues. This tool proves invaluable in resolving various errors that may arise during the use of QuickBooks software. The following scenarios highlight when employing the Clean Install Tool becomes essential:
- If QuickBooks continues to display installation errors despite multiple attempts to install the software.
- When a user on the network encounters an error pop-up when trying to open multiple company files at once.
- When a basic reinstall of the QuickBooks Desktop software proves insufficient to resolve all errors, previous problems keep resurfacing.
This tool is developed to meet certain requirements and can be easily downloaded from the official website of Intuit.
At times it happens that QuickBooks Desktop function gets damaged and just performing a reinstall does not fix the issue you need to uninstall QuickBooks Desktop, rename installation files that are left behind, and then re-install the application.
This entire process is known as Clean Install or Clean Uninstall. You need to make sure that you have your QuickBooks software CD or installation files available with you. This will make sure that you have all the necessary docs available.
Follow the Steps for Uninstalling QuickBooks (Windows 7, 8, 10)
- Click on the Start
- Go to the Control Panel
- Select Add or Remove program/uninstall the program
- Choose QuickBooks and Uninstall it
- QuickBooks uninstalled completely
- Restart the computer
Follow the Steps to Install QuickBooks via quickbooks_clean_install_tool.exe
- Download the exe tool
- Install it successfully
- Click on all the positive options
- Run the tool after the installation is over
- Manually name the folders of installation one after another
- Install the tool and install QuickBooks latest version without any error
Easy Migration of QuickBooks Enterprise to QuickBooks Online
In case there is an Installation Error:
- Open task manager
- Go to the process tab
- Then choose the image name to write according to the alphabet order
- Choose the QuickBooks Manager file
- Click yes to end the process
What Does QuickBooks Clean Install Tool define in QuickBooks?
In QuickBooks accounting software, a clean installation tool introduces fixes to all problematic issues that block you from opening the company file. Not just this, the clean installation of QuickBooks allows circumstances like presentation and format issues, and many more to make things more clear. The dread of losing the accounting data of your company may emerge in QuickBooks users' minds, however, it is guaranteed that the clean installation of QuickBooks software will not influence the accounting data, as all that is available in the company file isn't associated with this cycle by any means. A clean install is a bit-by-bit measure, which includes the uninstallation of QuickBooks for Windows, renaming the installation files, and after that reinstalling the program.
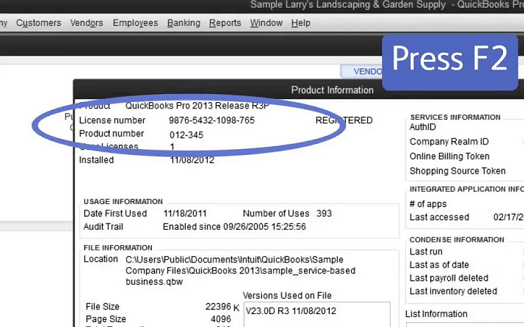
Must be sure that the QuickBooks download file or Installation CD, and the license numbers are available to unlock all services. When the QuickBooks software is uninstalled from the system, the user should have the item and permit number, to sign in back to the software. To guarantee in advance, hit click on the F2 key and then Press Ctrl +1 together to view the product data
To prevent any loss of data while fixing the errors, QuickBooks users are needed to create their company backup file. However, there are the least possibilities for any data misfortune, yet to be on a more secure side is constantly suggested.
- To create a company backup file, the user needs to insert a flash drive in the system for the backup
- Then, make the backup of the company files for the open QuickBooks
- Now, you have to track the file and click on the backup company option. It will make a local backup
- After this, the user needs to choose between the alternative local backup or online backup according to the inclination.
- Be that as it may, it is protected to save files on the flash drive as it is a fast method of transferring files back
- Move forward with displayed guidelines and click on the Next button until the program is not finished
The Clean Install Tool has a Few Points to Note Before Using It
Before utilizing the tool, it's crucial to understand the functionality of the QuickBooks Clean Install tool. This tool thoroughly removes files from the computer, emphasizing the importance of creating a backup of essential files before initiating the process. Additionally, the following list outlines key items to have on hand, ensuring minimal data loss:
Back-Up Your Company files:
- Begin the procedure by inserting a flash drive into the system to facilitate the backup.
- Subsequently, generate a backup of the company files by opening QuickBooks Desktop.
- Navigate to the "File" menu and select the "Backup Company" option to create a local backup.
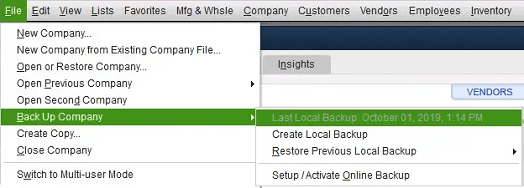
- You have the option to choose between Local Backup or Online Backup based on your preference. However, opting for a Flash drive is recommended as it provides a swift method for file transfer.
- Upon completion, click "Next" and follow the on-screen instructions to finalize the backup.
Keep the License and Product Number Handy
After uninstalling QuickBooks from the system, have the product and license number ready to log back into the software. Make sure you already have these details by pressing the F2 key or CTRL+1 key to open the Product Information window.
Follow the Below-Mentioned Instructions Step-by-Step to Run the Clean Installation of QuickBooks
Step 1: Uninstalling QuickBooks Desktop
- First of all, press the "Windows+ R" keys together to see the "RUN" command on the screen of their system.
- Then find the "Control Panel" section and click on it.
- Perform on-screen guidelines until you are finished with the subsequent step, it is the ideal opportunity for you to choose the "Programs and Features" option.
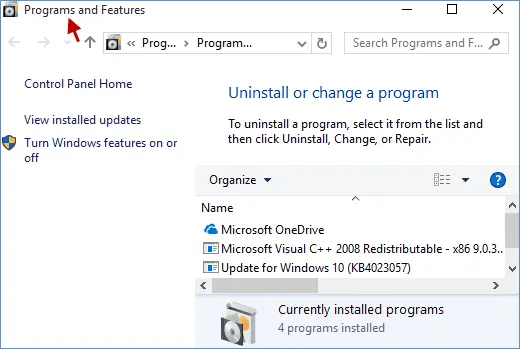
- Go to the "Projects List" option and then choose QuickBooks, followed by tapping on uninstall.
- Click on the "Finish" button and you are all done with this step.
Step 2: Rename QB Installation Folders to Completely Uninstall QuickBooks
If the problem still occurs then you have to go with this alternate solution or you can say it is the second solution. This solution helps you in doing things step by step and also you know the mistake if you did it on your own. Do change the name of the folders using the process that is mentioned below:-
- First of all, uninstall the QuickBooks same as the above solution.
- Now display the hidden files.
- Go to the file explorer.
- Then click on the View menu at the top left side.
- Select the option Display hidden files.
- Open the File Explorer, then search for the folder having the QuickBooks software files that are located in one of the following locations:-
- C:\Program Files\Intuit\QuickBooks (year)
- C:\Program Data\Intuit\QuickBooks (year)
- C:\Program Files (x86)\Intuit\QuickBooks (year)
- C:\Users\(current user)\AppData\Local\Intuit\QuickBooks (year)
- After reaching the folder, right-click on it, and from further options click on the Rename option.
- Now add the OLD at the end of the name of all the folders or files.
- After that, you have to again install the QuickBooks Desktop software in your system.
These steps will help if you get the error message "The access denied while renaming the folder":
- Press Ctrl + Shift + Esc to launch the Task Manager. Alternatively, you can search for Task Manager in the Start menu.
- Navigate to the Processes tab.
- Click on the Name column header to organize the list.
- Subsequently, locate the following QuickBooks-related processes in the Processes tab: Qbw32.exe, QBDBMgrN.exe, QBDBMgr.exe, QBCFMonitorService.exe. For each of these processes, click on the End Process button.
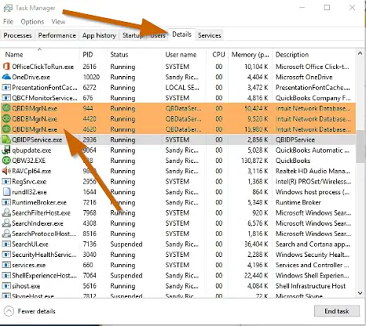
- If you receive the warning message "Terminating a process can cause undesired results," click on the Yes button.
Step 3: How to Download and Run QuickBooks Clean Install Tool?
- The first step to download the QuickBooks Clean Install Tool.exe file from QuickBooks took the hub
- Then, you have to save the file on your system
- The next step to be performed is to open QuickBooks Clean Install exe.
- After this, click on the "I agree" option from the permit agreement that shows up on the screen of the user
- Moving forward pick the QuickBooks current version and then click on the Continue button
- Hit the OK when a message appears on your screen
- Now, QuickBooks is ready to do a Clean, and you can install this to the default directory.
Step 4: Reinstall QuickBooks Desktop
This step involves reinstalling the QuickBooks Desktop program on your system. Before proceeding, it's advisable to ensure you have your product and license keys in order. Once you've taken care of this, you are ready to proceed.
- Insert the QuickBooks Desktop CD and follow the onscreen instructions.
- Once the software is installed on the system, it will prompt you for the Product and license numbers. Enter the credentials exactly as they were recorded in the system earlier.

- After providing the above information, follow the on-screen instructions to complete the process.
- Click on the Next button.
- Choose the type of installation and click Next, then select the Install button.
- Upon completion of the process, you will be able to run QuickBooks.
Step 5: How to rename the QuickBooks Installation Folders manually?
The most common query encountered in your mind that how to change the name of the QuickBooks installation folder. Here, you find the steps to be performed by the users to manually rename the company folders which are recorded for the Windows version. They should simply Add old or damaged words, where the folder name closes. By doing this, the users will want to stay away from QuickBooks from recognizing the folder when the user makes the upgraded one.
In any case, if the user faces any type of issue expressing the entrance denied while renaming the folders, then you should simply follow the below guidelines:
- Hit the first right-click on the Windows taskbar, then all options will appear on your screen
- Then, go to the Processes tab and pick the choice Image name column header for sorting out the processes sequentially
- Now, the user is required to choose the QBDBMgern.exe, QBDBMr.exe., and qbw32.exe, respectively followed by hitting the 'END' choice.
- The last step is to press yes on the message that shows up on the screen expressing a warning if you end the process that will prompt undesired results including data loss and system instability.
Step 6: Using QuickBooks Clean Install Tool for Windows
During this step, renaming the installation folders is necessary, and the QuickBooks Clean Install tool can assist with this task. The process involves the following steps:
- Begin by downloading the QuickBooks Tools Hub from the official Intuit website.
- Proceed to the location where the download is saved and double-click on the downloaded file to start the installation process.
- Follow the on-screen instructions to install the program.
- Click on 'I Accept' to finalize the installation, then open the QuickBooks Tool Hub from the Desktop.
- Within the tool hub, select the Clean Install Tool under the Installation Issues tab.
- Choose the previously installed QuickBooks Desktop Version and click on the Continue button.
- After a brief period, the screen will display the message "Please Install your copy of QuickBooks to the default location." Click OK to complete this step.
QuickBooks Desktop Installation on Windows: Step-by-Step Guide
Using the clean install method, uninstall and reinstall QuickBooks. Follow the steps below to ensure that the app is installed correctly.
Step 1: Hosting QuickBooks on a Network
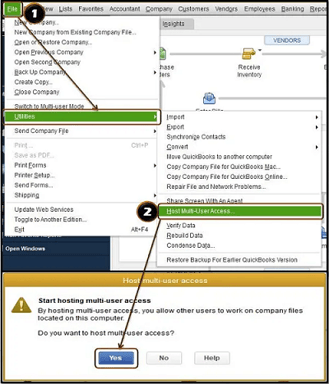
When initiating QuickBooks on a network for the first time, it's necessary to configure a multi-user network and install QuickBooks Database Server Manager.
Step 2: Installing QuickBooks Desktop
- Open the executable file from the newly downloaded package after uninstalling and reinstalling QuickBooks Desktop.
- Follow the on-screen prompts, including accepting the software license agreement for uninterrupted and legal operations.
- Next, click "Next."
- Enter your product and license numbers, then select "Next."
Step 3: Preparing for Installation
- Ensuring that your system meets crucial requirements for compatibility and full functionality is a prerequisite for using the QuickBooks Clean Install Tool.
- Afterward, download the appropriate version of QuickBooks Desktop onto your device and save the file in a readily accessible location, such as your Windows desktop.
- Be sure to note or write down the product and license numbers for future reference.
Step 4: Choosing the Installation Path
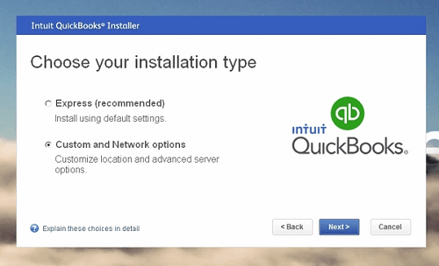
There are two types of installation options for QuickBooks Desktop: Express or Custom, and Network.
Express Install :
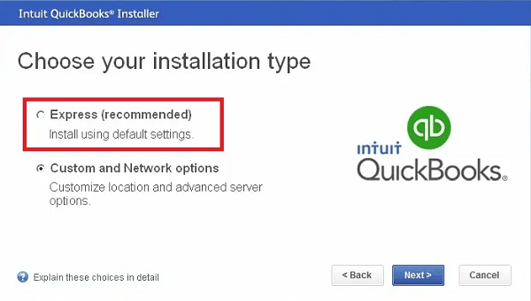
This option is recommended for:
- First-time users.
- Reinstalling QuickBooks.
- Installing QuickBooks on a single computer (not part of a network).
- Click on "Express."
- Then, click "Next."
- Select "Install."
- Upon completion, click "Open QuickBooks."
Custom and Network Install:
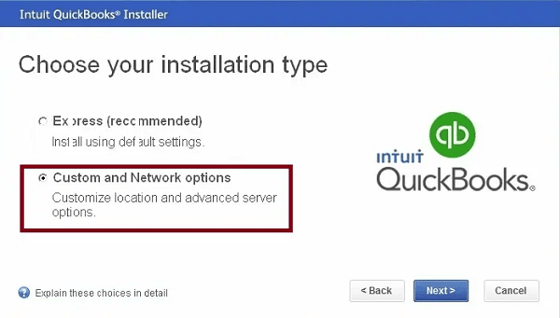
We recommend a custom installation if you:
- Open QuickBooks in a location different from the default one (e.g., on a server).
- Host your company files on a server.
- Have a multi-user network setup.
- Select "Custom and Network Options."
- Click "Next."
- Indicate your intention to run QuickBooks.
- Proceed to the next window.
- Choose "Change the install location."
- Utilize the "Browse" option to specify the location for your QuickBooks folder (typically found in the Programs folder).
- Hover over "Next" to initiate the installation.
- Once completed, click "Open QuickBooks."
QuickBooks Clean Install for Mac
The following steps will guide you through a clean installation of QuickBooks on a Mac:
Step 1: Uninstall QuickBooks for Mac
- Shut down QuickBooks for Mac.
- Navigate to the Finder menu on your Mac desktop and click on "Go."
- Choose "Applications."
- Find the QuickBooks for Mac icon and drag it to the Trash.
Step 2: Remove User and System PLIST QuickBooks files
To reset preferences to their default settings, delete both User and System PLIST files. This action will unregister your QuickBooks for Mac products upon reinstallation. Follow these steps for each folder.
User PLIST
- While on your desktop, access the Finder menu and click on "Go."
- Hold down the Option key, then select "Library."
- Navigate to the "Preferences" folder.
- Locate PLIST files with "QuickBooks" and your version in the name, then move them to the Trash. Make sure to delete ALL files containing "intuit.QuickBooks20XX" (where XX represents the year of your version).
- Empty the Trash.
System PLIST
- In a new Finder window or using the desktop icon, access "Macintosh HD."
- Go to "Library," and then open the "Preferences" folder.
- Find PLIST files with "QuickBooks" and your version in the name, then move them to the Trash. Ensure you delete ALL files containing "intuit.QuickBooks20XX" (where XX represents the year of your version).
- Empty the Trash.
Step 3: Restart Your Mac
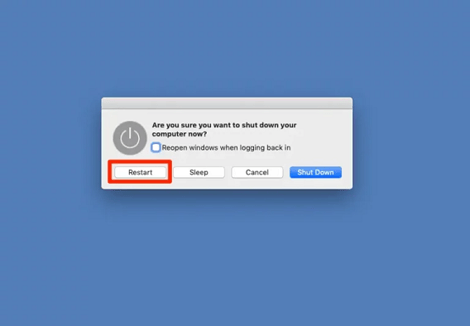
Perform a standard restart of your Mac.
Install QuickBooks Desktop on Mac
- Close all currently running applications.
- Double-click the downloaded installer from where you obtained your QuickBooks for Mac license. This action will automatically open the QuickBooks installer.
- Drag the QuickBooks icon into the Applications folder, and the Applications folder will open automatically.
- Following the installation, double-click the QuickBooks for Mac icon to launch the application.
With a comprehensive understanding of the QuickBooks Clean Install Tool and the clean installation process, we trust that the QuickBooks desktop application functions smoothly. The clean install procedure in QuickBooks is essential for eliminating all problematic files and folders before setting up your device for a fresh installation. While we have endeavored to explain the entire process with detailed insights and step-by-step guidance, we encourage you to contact our professional team smbaccountants.com for any queries or uncertainties.
Frequently Asked Questions
What are the things you need to consider before uninstalling the QuickBooks software?
- Ensure you have the License number, and product ID so that you can easily download files from the installation CD or link.
- Make a backup of the company file.
How can I run the QuickBooks clean installation tool?
- Download the tool and then save it as you save other files on the system.
- Locate the folder and then open the downloaded file.
- Now you have to read the terms and conditions and then hit on I accept to confirm that you agreed to them.
- Select the suitable version you are using and then hit on Select.
- Give a click on the OK button to start the installation process.
What to do if I get an error when trying to rename the installation folder?
- Locate Windows TaskBar and then do right-click on it.
- Choose Task Manager.
- Locate Processes option.
- Choose the Name column header listed in the list.
- Pick the below processes.
- QBDBMgrN.exe
- QBDBMgr.exe
- QBCFMonitorService.exe
- Qbw32.exe.
- Click on End process
- Choose yes if you see any warning message
How do I use the clean install tool in QuickBooks?
- Uninstall QuickBooks using the Add/Remove Programs tool in Windows.
- Remove the QuickBooks folder from your computer.
- Download QuickBooks from the Intuit website and proceed with the installation.
- After installing QuickBooks, register it using your license number.
How do I uninstall clean install QuickBooks?
Look for "Control Panel" and open it from the search results. Click on "Programs and Features" or "Uninstall a Program." In the list of programs, select the version of QuickBooks Desktop you wish to uninstall. Click on "Uninstall/Change" and then choose "Remove."