

A 1099 is to be prepared for all contractors and non-employees that you have paid $600 or more within the tax year. Except for corporations, all individual contractors and LLCs that are within the $600 threshold must be issued a 1099. A Form 1096 must also be prepared and sent with the IRS 1099 copy forms, as a summary sheet.
There are two general deadlines:
1) January 31st, following the year you are preparing 1099’s for – must issue 1099’s to all qualified recipients by this date.
2) February 28th, following the year you are preparing 1099’s for – must send forms 1099 along with a form 1096 to the IRS by this date.
Table of Contents
How to Set up 1099 Vendors in QuickBooks?
Here are the steps you can follow to set up vendors in QuickBooks:
- First, open the QuickBooks and click vendors in the left side menu bar.
- After that, go to the Vendor Center, and click on “New Vendor” in the upper right corner of the screen, and the Vendor Information screen will open.
- Then, enter all the vendor’s information:
- Enter the vendor’s first and last name.
- Enter the vendor’s company name in the Company field.
- Enter the vendor’s display name, exactly as you want it to appear in the vendor list in QuickBooks.
- Enter the vendor’s email address in the email field.
- Enter the vendor’s phone, mobile/fax number in the Phone and Fax Number fields, and enter the vendor’s website address. (Optional).
- Enter the vendor’s address in the Address field.
- In the Notes field: Enter any notes for the vendor that you want to track.
- Enter the payment terms in the Terms field. Example: Net 30 means payment is due 30 days after the invoice date.
- Leave the opening balance field blank. When you are a new QuickBooks user and you owe money to a vendor, you should enter vendor bills for the amounts owed to the vendor.
- Enter the vendor’s account number in the Account Number field. (This number appears on the check memo and is helpful for utility payments.)
- After that, Click on the Save option.
If your company is already established and you’re setting up QuickBooks Online for the first time, or you’re switching from the QuickBooks Desktop edition, you can import your vendor list using an Excel file in CSV format.
- First, save your vendor list in an Excel spreadsheet.
- Then, click on the gear icon and select Import Data under Tools.
- After that, click on the Vendors icon, and download a sample file to see a sample in Excel format, so you know the file format and which fields you need.
Important Note: Ensure that the format of your Excel file matches the sample file exactly.
- Then, click Browse and select the Excel file from the location where you saved it.
- Then, click Next in the bottom right corner, and map the data fields to QuickBooks, and click Import.
- After that, the vendors will be ready for use in your QuickBooks.
You may also read this: How to Create and Set Up File 1099s in QuickBooks Desktop and Online
Struggling With Accounting or Bookkeeping?
Talk to our experts in minutes — No wait time!
- Free Consultation
- Fast Response
- Trusted Experts

How to Prepare and Print 1099’s in QuickBooks
STEP 1. Setup Vendors for 1099:
- To edit a vendor, go to Vendors in the left menu bar and double click on the vendor.
- Insert the vendor’s tax ID number at Tax ID and check the box below Track payments for 1099 at the top right of the screen. (You may want to make sure that the vendor addresses are current and accurate. You should have sent out W9 forms to each eligible vendors prior to year end, asking them to complete, sign and return the form to you. This is very important, as the form will contain the correct address and tax information. It will also allow you to see if they are a corporation, and therefore exempt from 1099.)
- Click Save.
STEP 2. Map 1099 Vendors to Accounts:
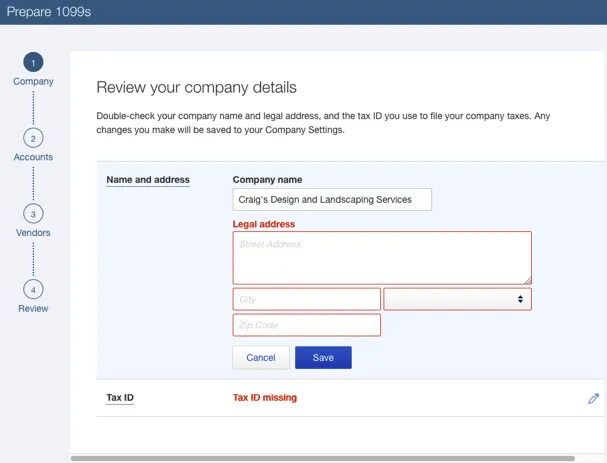
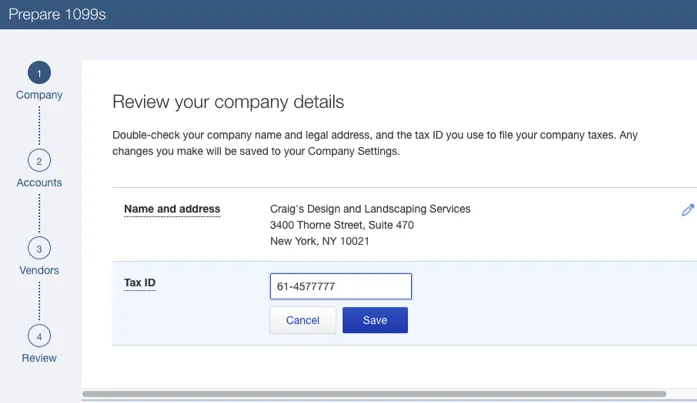
- Click on Vendors in the left menu bar, then Prepare 1099s at the top right. If you have already begun setting up 1099s, click Continue your 1099s.
- In this section, you should already have your company name and tax ID number if you have already gone through the setup process. If not, go ahead and enter your company’s address and tax ID number. (You must click Save in one section before moving to the next section. To edit the Tax ID, or Address area, click the pencil icon at right.)
Before
After
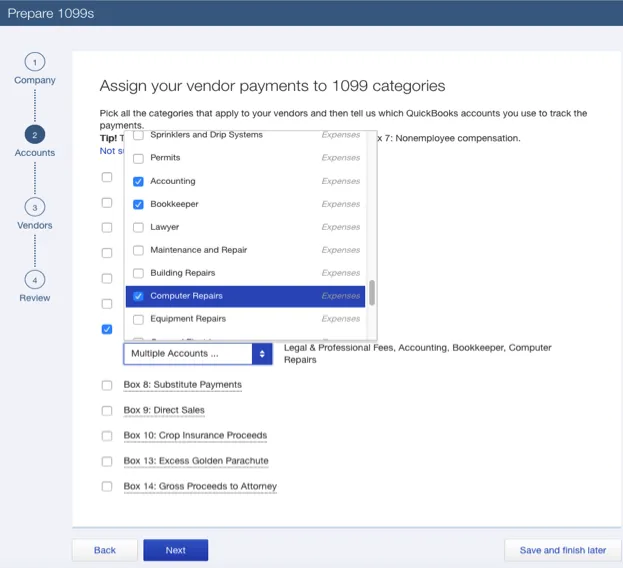
- The most common type of compensation is box 7: Nonemployee compensation. Click Next and select the box that corresponds to your type of compensation. I tell my clients to use box 7 whenever in doubt. You should make sure all qualified monetary recipients receive 1099s within the threshold, which is the most important thing.
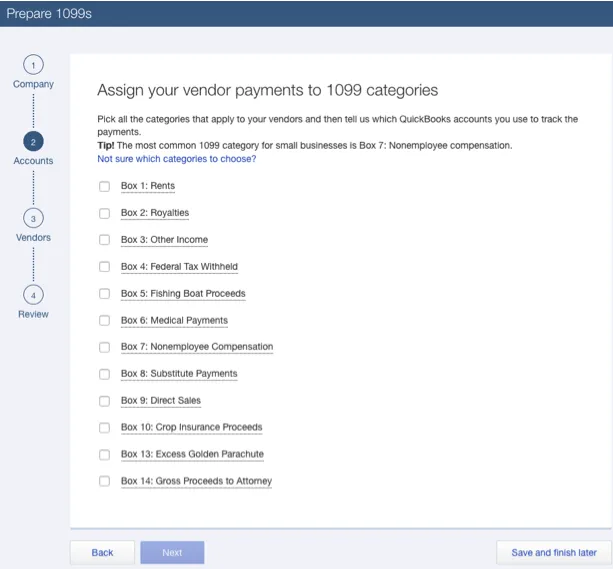
- Now click the dropdown at Choose an account, and check the boxes to the left of all the accounts that relates to the vendors who qualify for a 1099 (as shown in the screenshot below).
- Click Next (This section will show you all the vendors that you have setup for 1099’s as shown in screenshot below).
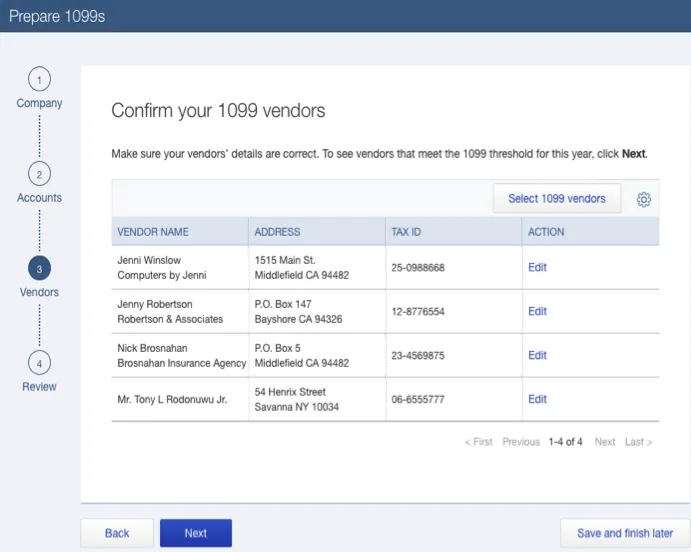
- Click Next again. (This section will show you the vendors who are within the qualified threshold, and thus eligible for 1099 for this period . (NOTE: It is always important to have a vendor summary list on hand with the eligible vendors noted. If you get to this point of the 1099 process and you do not see some vendors included for 1099, it means that you did not check off their account during the mapping phase. You can use the Back button at any time to go back to add accounts you use for the vendors and make other corrections)
- If all looks okay in this section, click Next. You will now be taken to the “Hooray” screen as I call it, where you can either click Go to 1099 E-file Service to allow Intuit to efile your 1099’s for you for a fee. Or you can click on Print and mail forms to print and mail them yourself. (Please note that you cannot print and mail them on regular printing paper, there are specific preprinted forms designed for this purpose. You can get them at office supplies stores such as Staples and Officemax. There are a variety of the same form available – meaning, some of them are designed to be used in laser printers (single sheets), while some are multi-sheets designed for typewriters etc.)
- You can check if your form aligns with the preprinted form by following the instructions and printing it on plain paper. If so, great. If not, follow the troubleshooting tips from the Step you are at. It may take some time to figure it out. As long as you are within the deadline, you can select the option to have Intuit E-file for you if you become frustrated with this section.
Troubleshoot 1099 Print Alignment Issue
Here are a few steps to help you correct printing issues with 1099s:
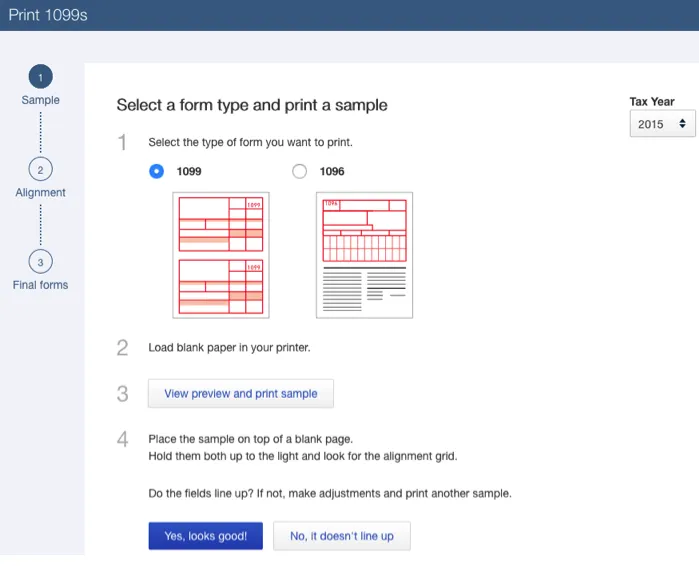
- Go to Vendors on the left and then click on Prepare 1099s in the top right corner
- Click on View preview and print sample in Section 3. For the following test, you will need plain paper. You can hold this printout against your preprinted 1099 form to make sure everything lines up correctly. If it does not line up, click No, it does not line up.
- Set the Vertical and Horizontal fields to “0” in the Fine-tune alignment Section 2. If it is still not aligned, play around with the horizontal and vertical numbers until it is. It is usually aligned at “0.”
- To print, click Next, then Next when it’s properly aligned.
How to Set up Direct Deposit for a 1099 Vendor in QuickBooks Enterprise?
In order to pay 1099 vendors via direct deposit, you must first subscribe to QuickBooks Payroll and activate direct deposit, even if you aren’t paying any employees.
Here’s how to activate direct deposit for paying 1099 vendors:
- Select My Payroll Service from the Employees menu.
- Click Account/Billing Information.
- Click Activate next to 1099 Vendors in the Direct Deposit section of the Account Maintenance window.
- Provide your Direct Deposit PIN (the same PIN you use for sending payroll direct deposits).
Note: In this section, you are not asked to provide a company bank account since direct deposits to 1099 vendors are made from the same bank account you use for payroll direct deposits.
To set up a 1099 vendor to receive direct deposit payments:
- Click Vendor Center from the Vendors menu.
- Choose the 1099 vendor you want to set up for direct deposit from the list on the left.
- In the Vendor Information section, click Set Up Direct Deposit.
- If you select the Use Direct Deposit for checkbox, QuickBooks assumes that you want to pay this vendor by direct deposit whenever you pay this vendor.
- Enter the Vendor’s bank account information.
- Select the checkbox if you want Intuit to send an email notification to the 1099 vendor when the payment processes, and make sure the email address is correct (which comes from the vendor’s account information).
- Click OK.
Frequently Asked Questions
Why are 1099 Vendors not showing up in QuickBooks?
Go to Edit, select Preferences. On the Preferences window, select Tax:1099 from the left pane, then select the Company Preferences tab. Select the link click here next to If you want to map your accounts to boxes on form 1099-MISC. The QuickBooks 1099 wizard page will come up.
How do I set up a 1099 contractor in QuickBooks Online?
Go to Expenses>>Vendors and then click on New Vendor.
- You can also create and manage records for your independent contractors in the Payroll Tab.
- There’s also a checkbox to Track payments for 1099s.
- As always, if you need to make any changes, click on the vendor’s name and then Edit.

Adams Williams
Adams Williams is a seasoned accounting professional with over 4 years of experience in bookkeeping, financial reporting, and business accounting solutions. Specializing in QuickBooks software, Adams combines technical expertise with clear, accessible content writing to help businesses streamline their financial processes. His insightful guides and how-to articles are crafted to assist both beginners and seasoned users in navigating accounting software with confidence.

