One of the most troublesome issues faced by QuickBooks users is the "QuickBooks Email Invoices Not Working" error. Invoices play a crucial role in the accounting and bookkeeping department, serving as records for all sales bills. It is essential to send invoices to the concerned parties promptly for various reasons. Therefore, any disruptions in the invoicing process due to the application's inability to process invoices can be a significant concern for users. To address this problem effectively, we have compiled a comprehensive troubleshooting guide that covers everything you need to know about this issue, including its potential consequences and the necessary steps to rectify the situation.
Sending invoices and statements to customers through QuickBooks is a common task for users. However, some users may encounter difficulties when attempting to send these emails through email service providers like Outlook or Yahoo. If you are receiving an error message stating "QuickBooks is unable to send your emails to Outlook," you are not alone. To help you resolve this issue promptly, we have compiled a comprehensive set of instructions to identify the possible causes and troubleshoot the problem. Follow the steps outlined in this article for a detailed guide on resolving the "QuickBooks Unable to Send Invoices" error or any email-sending issues in QuickBooks.
What is "QuickBooks Unable To Send Your Invoice from Email" & How to Fix It?
Many QuickBooks users have reported that their QuickBooks email invoices do not work. The error appears as a pop-up when a user attempts to send invoices to their customers via email. The QuickBooks program refuses a user's attempt and does not let them accomplish this task. As a result, panic and frustration occur, especially if none of the troubleshooting methods work.
At times when you attempt to email a report or transaction you might face the error message:
“QuickBooks is unable to send your email to Outlook. Close any open Outlook windows and try again”.
“QuickBooks is unable to send your emails.”
“Couldn’t Connect to Email Server: We were unable to connect to the email server for your email provider.”
It appears that QuickBooks was unable to send your form for the following reason: QuickBooks was able to connect to the server, but could not understand the response. Please try again to confirm that the problem has been resolved on the server."
Encountering such error messages can create a sense of concern and panic for QuickBooks users who seek uninterrupted and smooth functioning of their accounting tasks. Unfortunately, until this error is resolved, they may face difficulties in processing invoices and bills seamlessly. To help address this issue, we have compiled comprehensive details and effective solutions that you should try without hesitation.
Causes for QuickBooks Send Email Not Working Error
Before you go through the solutions to deal with the restricted sending of email invoices from QuickBooks, you must know the causes of the issue.
These include:
- Incorrect setup of email preference
- A damaged MAPI32.dll file
- QuickBooks running as administrator
- A damaged QuickBooks installation
- A damaged Outlook installation
- Outlook is open in the background when sending the email through QuickBooks
QuickBooks Not Sending Invoices Symptoms
The following are some things people have experienced when they could not email invoices to their clients:
Stuck invoices in the Outbox
If you are using an email client integrated with QuickBooks, like Outlook, and you observe that invoices are staying in the Outbox folder without being sent, it indicates that the sending process has not been completed successfully.
Sending Test Emails failed
When you send a test email from QuickBooks to verify the email settings, but the test email fails to be delivered, then there is an issue with the email functionality.
Error message or email confirmation not received
After attempting to send an invoice, if you don’t receive any email confirmation or encounter an error message indicating a problem with sending the invoice, it suggests that QuickBooks is not successfully delivering the invoices.
Sent Emails Missing in Sent folder
If you do not see the sent invoices in your email client's Sent folder, it indicates that QuickBooks is not sending emails correctly.
Automatic Crashes and Freezing Apps
QuickBooks users often encounter frequent application crashes, freezing, and various other issues, leading to problems with invoices. Despite pressing the mouse and keyboard repeatedly, there is no response to the commands, making it difficult to proceed with invoice-related tasks.
Solutions for Unable to Email Invoices From QuickBooks
There are a couple of solutions that you need to go through to make sure the issue is resolved. The first one is the most common and most effective of all. In case, the first one does not work, try the rest on the list.
Solution One: Make Sure QuickBooks is Not Running as an Administrator
- Go to the QuickBooks icon and right-click it
- Select Properties
- Choose Compatibility tab
- Deselect Run this program as Administrator(If the Run this program as Administrator option is grayed out, select the Show Settings for All Users option)
- Click OK
- Exit and then restart QuickBooks
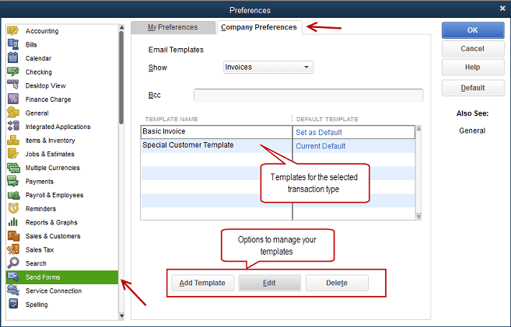
Solution Two: Check Email Preference Settings in QuickBooks
For users of Microsoft Outlook with Microsoft Exchange Server, it is recommended to log in to Outlook before checking the email preferences in QuickBooks.
The steps to be followed further are as follows:
- Go to Edit
- Choose Preferences
- Select Send Forms
- Go to the My Preferences tab
- Now set Send e-mail using the option you want
- Click OK
- To check the preference settings, you can:
- Go to Edit
- Then, select Preferences
- Click Send Forms
- Choose the My Preferences tab
- Select QuickBooks E-mail
- Click OK
- Choose Edit
- Select Preferences
- Choose Outlook
- Click OK
- Now close QuickBooks and other programs that are running
- Restart Windows
- Now restart QuickBooks
- Email the report, invoice, or transaction
Solution Three: Check Email Preferences in Internet Explorer
Once the email preferences in QuickBooks are checked, the next thing is to ensure the email preferences are correctly selected in Internet Explorer.
To achieve this, you can:
- Close QuickBooks
- Open Internet Explorer
- Go to the Tools tab
- Choose Internet Options
- Now go to the Programs tab
- Make sure the correct email program is selected in the Programs If the required email program is not selected as default, you can select the correct one.
- Click Apply
- Then, click OK
- Close Internet Explorer
- Open QuickBooks
- Email the report, invoice, or transaction
Solution Four: Examine & Repair MAPI32.dll
It is the most advanced technique to resolve the issue. Hence, having a professional do this is recommended.
The steps or instructions to be followed are as follows:
A. Step One: Test MAPI32.dll functionality by using Word
- Restart your computer
- Open a blank Microsoft Word document
- Go to the File menu
- Choose Send
- Select Email as PDF Attachment
- If the email does not open without showing any error, professional assistance is mandatory.
- As soon as the email issue is resolved from MS Word, email the report, invoice, or transaction from QuickBooks
B. Step Two: Repair MAPI32.dll
- Close all programs that are currently running
- Click Windows Start
- Select Computer
- Go to C:\Windows\System32
- Double-click exe
- Follow the instructions as and when appears
- Restart your computer after exe completes its action
3. Step Three: Rename MAPI32.dll
This is optional in case step 2 doesn’t work.
To resolve the issue in such a scenario, you can:
- Close all programs that are currently running
- Use File Explorer
- Go to C:\Program Files(x86)\Common Files\System\MSMAPI\1033i
- Right-click dll, and rename it to MAPI32.dll.OLD
- Restart your computer
- Now run exe again
- Restart your computer once the exe action is complete
5. Solution Five: Reinstall QuickBooks Program
When none of the above solutions are working, it is recommended to reinstall QuickBooks.
To do this, you can follow the below-mentioned instructions:
- Go to the Downloads and Updates page of the official website
- Click the [Change] link to install the latest version by choosing the correct version and year
- Click Download button
You should delete and reinstall QuickBooks if you are not able to resolve the QuickBooks cannot send invoices via email error:
Step 1: Complete the QuickBooks deletion process
In order to remove QuickBooks from the system, you will need to follow these steps:
- Access the Control Panel on your computer.
- Within the Control Panel window, select either "Programs" or "Programs and Features" from the main menu.
- Scroll through the list of installed programs under the "Programs" tab and locate QuickBooks.
- Right-click on QuickBooks and choose the "Uninstall" option.
- Follow the prompts to complete the uninstallation process and remove the source of the issue causing QuickBooks not to send invoices.
Step 2: Download the QuickBooks installer
To start fresh, you'll need to reinstall QuickBooks from authentic sources. The procedure is as follows:
- Open your internet browser and visit the official QuickBooks or Intuit website.
- Look for the download page specifically designated for QuickBooks.
- Make sure to select the appropriate version and edition of QuickBooks that you wish to install, which will help resolve the email-related issue.
- Click on the download link provided to initiate the QuickBooks installer download.
Step 3: Let the Installer loose
Once you have successfully downloaded the QuickBooks program without any issues or errors, proceed with its installation using a stable internet connection and ensuring that your system meets all the necessary requirements. To initiate the QuickBooks installation, follow these steps:
- Start by locating the QuickBooks installer file, which is typically stored in your computer's Downloads folder after the download.
- Double-click on the QuickBooks installation program to run it, which will initiate the installation process and prompt a few setup wizards for you to follow.
- During the installation, you may be prompted to grant critical permissions to the installer. Make sure to provide the necessary permissions and allow the modifications to be made to your system.
Step 4: Install QuickBooks by following the instructions
To begin the QuickBooks installation process, run the installer, which will lead you through the installation wizards, providing step-by-step guidance. During this process, you will come across a license agreement that you must review and accept to proceed smoothly. Next, you'll be prompted to choose the installation location by either using the default location or selecting a custom location through the Browse button. Additionally, you can choose any additional components or features you want to install to enable the emailing of invoices from QuickBooks desktop. Finally, follow any remaining on-screen instructions and provide the necessary information when prompted to complete the installation successfully.
Step 5: Provide License and Product Details
During the QuickBooks installation, you might be prompted to enter your QuickBooks license and product details. To resolve the issue of QuickBooks not sending emails, it's essential to have this information readily available. When reinstalling QuickBooks Desktop, make sure to enter your license key when prompted. Similarly, if you are reinstalling QuickBooks Online, you may need to sign in with your Intuit account to proceed with the installation. Having these details on hand will ensure a smooth reinstallation process and help fix the email-related problem.
Step 6: Complete the QuickBooks installation
Once you have provided all the necessary information for QuickBooks reinstallation, the installer will begin the process of installing QuickBooks on your device. While the installation may take some time, it is essential to be patient. After the installation is complete, it is recommended to reboot your device. Restarting will help apply the necessary modifications and verify if the issue of QuickBooks being unable to send invoices has been resolved.
Step 7: Update QuickBooks
After successfully reinstalling QuickBooks, it is crucial to update it to the latest version. Open the QuickBooks program and check for any available updates. If updates are found, do not delay in downloading and installing them promptly. By keeping your QuickBooks software up-to-date, you can avoid potential issues with invoice sending, and you won't have to wonder why your QuickBooks invoices are not sending.
Solution SIX: Update the Admin Privileges
The following steps should be taken by QuickBooks users to ensure that the application is not automatically set to run as administrator:
- Close your currently open QuickBooks Desktop application.
- Access the Start menu to initiate the resolution process for QuickBooks email issues.
- In the Start menu's search option, type "QuickBooks" to locate the QB icon quickly.
- Right-click on the QuickBooks icon and select "Open File Location" from the menu.
- The "Open File Location" wizard will appear, and within the folder, locate the QuickBooks.exe file.
- Right-click on the QuickBooks.exe file and choose "Properties."
- In the Properties window, select the "Compatibility" tab if you are facing issues with emailing from QuickBooks.
- Look for the checkbox that says, "Run this program as administrator" and make sure it is unchecked.
- In some cases, this option might not be visible due to certain settings. To access it, click on "Show Settings for All Users."
- After making any necessary changes, click "Apply" and then "OK" to validate the modifications.
Solution Seven: Upgrade the QuickBooks Program
Users constantly annoyed by QuickBooks invoice delivery errors should upgrade their QuickBooks software. QuickBooks and Intuit experts suggest upgrading if you're on a 2022 version or earlier.
The QuickBooks 2023 version comes with an update that includes bug fixes and security patches, making the use of QuickBooks Email smoother and more reliable. To upgrade your QuickBooks product to the latest version, follow these steps:
- Log in to your Intuit account at camps.intuit.com.
- Access the Products and Services list and locate QuickBooks Desktop 2023.
- Select "Details" for QuickBooks Desktop 2023.
- Click on the "Download" button.
- Proceed with the QuickBooks installation, which will update your software to the latest version and may help resolve the issue of undelivered invoices.
Solution Eight: Using the Install Diagnostic Tool to resolve QuickBooks Desktop installation issues
The QuickBooks Install Diagnostic Tool is highly regarded as one of the best tools for repairing any damage in the QuickBooks installation. To utilize this tool and fix QuickBooks installation errors, follow the instructions below:
- Download the QuickBooks Install Diagnostic Tool from the official Intuit website.
- Save the downloaded file on your computer.
- Close all running programs and applications on your system.
- Locate the downloaded QB Install Diagnostic Tool file and double-click on it to run the tool.
- The tool will start diagnosing and automatically fix any installation-related issues it encounters.
- The process may take some time, so be patient and let the tool complete its tasks.
- Once the diagnostic process is finished, restart your computer to ensure the changes take effect.
- After the restart, check if the QuickBooks installation errors have been resolved.
By following these steps and running the QuickBooks Install Diagnostic Tool, you can effectively repair any issues with your QuickBooks installation and ensure smooth functioning of the software.
Solution Nine: Reinstall QuickBooks Program
Delete and reinstall QuickBooks if you can't resolve the QuickBooks cannot send invoices via email error:
Step 1: Complete the QuickBooks deletion process
The following steps must be taken in order to remove QuickBooks from the system:
- Access the Control Panel in order to resolve the issue.
- Within the Control Panel window, select either the "Programs" or "Programs and Features" option from the main menu.
- Scroll through the list of installed programs that appears under the Programs tab.
- Locate QuickBooks within this list of installed programs.
- Right-click on QuickBooks and choose the Uninstall option.
- Follow the prompts that appear to complete the uninstallation process.
- By doing so, you will eliminate the cause of the "QuickBooks won’t send invoices" error.
Step2: Download the QuickBooks installer
After removing the QuickBooks application from your system, you will need to reinstall it from reputable sources to start anew. The process for obtaining the latest QuickBooks application is outlined as follows:
- Open your web browser and go to the official QuickBooks or Intuit website.
- Look for the download page dedicated to QuickBooks software.
- Be certain to select the accurate version and edition of QuickBooks that you intend to install, addressing the issue of QuickBooks email not working.
- Initiate the download of the QuickBooks installer by clicking on the provided download link.
Step 3: Let the Installer loose
Once you have successfully downloaded the QuickBooks program without encountering any issues or errors, it's essential to install it using a stable internet connection and ensuring that your system meets the necessary requirements. You can initiate the installation of the QuickBooks installer by following these steps:
- To address the problem of undelivered QuickBooks invoices, start by locating the QuickBooks installer file, typically located in the Downloads folder on your computer.
- Double-clicking the QuickBooks installation program will initiate the process and guide you through a series of wizards that you need to accept.
- Additionally, if you receive prompts, you should grant necessary permissions to the installer and allow the modifications to take place on your system.
Step 4: Provide license and product details
During the installation process, you might be prompted to input your QuickBooks license and product information. It's important to have this information readily available when you are reinstalling QuickBooks to address the issue of being unable to send emails from QuickBooks. When reinstalling QuickBooks Desktop, make sure you are aware of and enter your license key as prompted. Similarly, if you are reinstalling QuickBooks Online, you might need to log in using your Intuit account.
Step 5: Finalize the QuickBooks installation
Once all the necessary information is provided for QuickBooks reinstallation, the installer will install QuickBooks on your computer. Even though the installation process takes a bit of time, you can reboot your computer afterward. By restarting, you will be able to apply the changes and verify if QuickBooks cannot send invoices.
Step 6: Execute the QuickBooks installation wizard
Executing the QuickBooks installer will lead you to the installation wizards, which will systematically walk you through the process. This process entails reviewing and agreeing to a license agreement in order to proceed seamlessly. Next, you'll have the option to choose an installation location by clicking the Browse button or selecting the default location. Additionally, you can select any supplementary components or features you desire to install, ensuring the continuation of email functionality from QuickBooks Desktop. Lastly, adhere to any remaining on-screen instructions and provide the required information when prompted.
Step 7: Update QuickBooks
Upon successfully reinstalling QuickBooks, it is crucial to update it to the most recent version. Launch the QuickBooks program and check for any available updates. If you come across any updates for QuickBooks, don't delay; proceed to install them promptly. By doing so, you can hopefully avoid encountering issues with sending QuickBooks invoices and won't need to wonder why they are not being sent.
Other Factors Causing QuickBooks Invoice Sending Errors
Other reasons why QuickBooks users may have problems sending invoices include:
Firewall or Antivirus Blocking QuickBooks
In some cases, security software or firewalls might block QuickBooks from sending emails. To address this issue, it is essential to review your firewall or antivirus settings and ensure that QuickBooks has the required permissions to send emails. Granting the necessary permissions to QuickBooks will help avoid any interference and allow seamless email functionality within the software.
Spam or Junk Folder Filtering
Take the time to check your email account's spam or junk folder. It's possible that the invoices are being mistakenly flagged as spam and redirected to these folders. If you find the invoices in the spam or junk folder, mark them as "not spam" to prevent similar filtering issues in the future. This will help avoid triggering the "QuickBooks won't send email invoices" error and ensure that your invoices are delivered successfully.
Internet connection issues
A weak or unstable internet connection can cause disruptions in the process of sending invoices. To avoid any issues, QuickBooks users must ensure they have a stable and reliable internet connection before attempting to send invoices. A strong internet connection will help ensure a smooth and successful invoice-sending process within QuickBooks.
Configuration of Email Settings is Incorrect
QuickBooks users may face problems with sending invoices when their email settings are misconfigured or preferences are not set accurately. To resolve this issue, it is crucial to ensure that the email settings in QuickBooks are correctly configured. Double-checking the SMTP server, port number, username, password, and other relevant settings will help identify and rectify any inaccuracies, eliminating the problem. Incorrect email configuration can be a hindrance to QuickBooks' ability to send invoices successfully.
An outdated version of QuickBooks is available
Using an outdated version of QuickBooks is often the main cause of various errors, including those related to trouble sending invoices. To prevent such errors, it is crucial to use the latest version of QuickBooks. Upgrading to the most recent version will not only help avoid invoice-sending issues but also provide bug fixes and improvements that can resolve existing problems. Therefore, it is essential to check for any available updates and promptly install them to ensure a smooth and error-free experience when sending invoices in QuickBooks.
Google Account Blocks
Your Google or email account might be blocked, leading to interruptions in accessing and using it for sending invoices. If you are facing issues with sending invoices, it's essential to check the status of your Google or email account to ensure it is not blocked. Addressing any potential blockages will help resolve the problem and allow you to use your account seamlessly for sending invoices.
Incorrect Outlook installation
Invoices may not be sent correctly due to an incorrectly installed Outlook application.
Conflicting Apps in the Background
It is possible to have conflicting applications running in the background, such as Outlook open while you send invoices through software.
We hope that the troubleshooting methods mentioned above have been helpful in resolving the issue of being unable to send invoices in QuickBooks without much difficulty. However, if you are still facing problems with emailing invoices and statements from QuickBooks, we recommend reaching out to our experts for further assistance. Our team will be more than happy to help you with any lingering issues and provide the necessary support to resolve the problem.
Frequently Asked Questions
Why is my QuickBooks email not sending invoices?
Using QuickBooks to send invoices by email is not possible for a number of reasons. Your email preferences are currently set incorrectly. Please make sure to configure the account security settings for your email provider. It's also possible that there is damage to your QuickBooks installation, or your email settings are not configured correctly.
Can invoices be emailed in QuickBooks?
- Find the specific invoice you want to email.
- In the Action column, click on the drop-down arrow and choose "Send."
- Review the information to ensure it is correct.
- If needed, add any additional contacts you wish to receive the invoice.
- Click on the "Send" button to email the invoice.
Why is my QuickBooks invoice not being received?
If a customer's email is correct, but they haven't received the invoice, advise them to check their junk or spam folders. Additionally, you can verify your email address settings in QuickBooks Online, as it may be the cause of the problem. Follow these steps:
- Go to Customer & Leads in QuickBooks Online.
- Select "Customers."
3. Locate and select the specific customer who didn't receive the invoice.
How do I fix email problems in QuickBooks?
- Edit your admin privileges. Ensure that QuickBooks is not set to automatically run as an administrator.
- Edit your email preferences in QuickBooks.
- Check your Internet Explorer email preferences.
- Repair your MAPI32.
- Reinstall QuickBooks.
What Email Does QuickBooks use to send invoices?
When you connect QuickBooks to your Google account, you can send customers invoices from your Gmail address. You can manage all of your customer emails from one place. Note: Your sales form settings, such as email, will not change if you set QuickBooks Online to send invoices from your Gmail address.
How do I fix email problems in QuickBooks?
Resolving Email Issues in QuickBooks Desktop
- Confirm that QuickBooks is not running with administrator privileges.
- Verify that the Email Preferences in QuickBooks have been configured accurately.
- Double-check that the email preferences are appropriately configured in Internet Explorer to troubleshoot email-related problems in QuickBooks.
How do you tell if an invoice has been emailed in QuickBooks?
In the invoice toolbar, select the Reports tab, then select Transaction History. Under Invoice Information, check the Sent Date and Send Method. If there is no status, the invoice may have been tagged for Email Later.