


To fix QuickBooks license data sync issues, check your internet connection, verify license and product keys, adjust firewall settings, and update Internet Explorer settings. This error often occurs when upgrading QuickBooks Desktop from 2021 to 2024, preventing the system from connecting to the license server. Follow these steps to resolve it and restore access.
Table of Contents
- 1 What are the Unable to Sync License Data QuickBooks Issues?
- 2 What are the Main Causes of Sync License Data QuickBooks Error?
- 3 Common Symptoms of Unable to Sync License Data QuickBooks Problems
- 3.1 Method 1: Rename the EntitlementDataStore.Ecml File
- 3.2 Method 2: Use the QuickBooks Database Server Manager
- 3.3 Method 3: Check for Network issues using the File Doctor Tool
- 3.4 Method 4: Reset The Internet Explorer Settings
- 3.5 Method 5: Configure the Firewall
- 3.6 Method 6: Check and Ensure The Correct License and Product Number
- 3.7 Method 7: Internet Connectivity is Not Blocked by The Firewall
- 3.8 Method 8: Perform a clean install
- 4 How to Fix QuickBooks Could Not Load The License Data Error?
- 5 Frequently Asked Questions
What are the Unable to Sync License Data QuickBooks Issues?
QuickBooks users sometimes struggle to sync the license issue, leading to major problems. It usually happens when the user tries to sync the permit info. Stay in tune with this article at the end to get complete information on “How to fix unable to Sync License QuickBooks” including all related information.
“There was a problem in synchronizing your QuickBooks license data while using sync license”
What are the Main Causes of Sync License Data QuickBooks Error?
Factors that may lead to Syncing License Errors in QuickBooks desktop:
- The recent QuickBooks upgrade might not work with the OS.
- Important QuickBooks files could be damaged by an improper update procedure.
- The firewall might be preventing QuickBooks from connecting to the server, which would explain the Sync License issue.
- A file mismatch or corruption in the system program files are example of an ancillary cause.
- The Sync license issue may also become more serious due to specific network-related issues.
Common Symptoms of Unable to Sync License Data QuickBooks Problems
- Frequent freezing of the system.
- Upon being launched, QuickBooks immediately crashes.
- When attempting to sync data, error messages or warnings appear, such as Sync License Error or License Expired.
- No connection could be made to the server.
- Due to sync license concerns, it is impossible to view or retrieve important financial data.
- Data discrepancies could lead to inaccurate financial reports and analyses between QuickBooks and the third-party application.
The following factors may cause Sync License Data in QuickBooks Desktop There are several solutions recommended by Intuit to resolve this problem. Suppose your problem gets resolved following the first solution no need to opt for the other solutions. Follow the sequence of solutions provided by Intuit.
Below are the mentioned methods to resolve Unable to Sync License Data QuickBooks Issues:
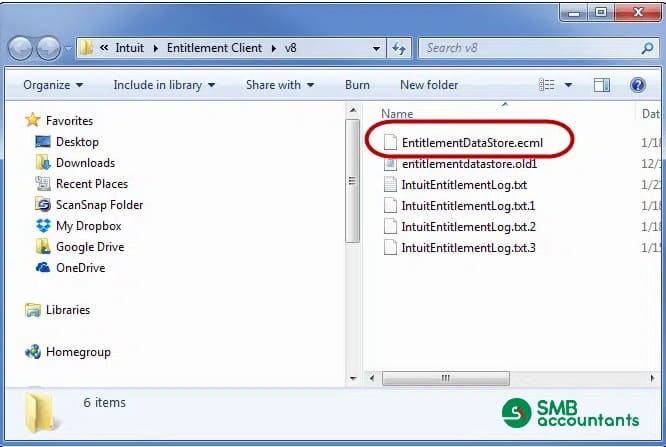
Method 1: Rename the EntitlementDataStore.Ecml File
Another way to resolve this error is to rename the EntitlementDataStore.Ecml File with the following guidelines:
The initial step is to check the entitlement client folder must be a hidden folder. Then users might be required to display all hidden folders and files to view and ensure all files utilizing the windows before implementing the below steps. The user has to check out how to display the hidden folders and files.
For window 10 users
- Firstly, you have to open your System tray.
- Hit the click on the Folder icon to initiate the File Explorer.
- Then, choose the View tab option and click on the Hidden items.
- At last, it will appear on your screen.
For Windows 8.1 & 8 users
- Press the Window + E keys together for a while to introduce the File Explorer.
- Hit the click on the View tab.
- Then, you have to select the file extensions and hidden products.
Search Files in Windows 8, 8.1 and 10
- From your keyboard, press the window + E simultaneously to launch the Windows Explorer.
- Then, you have to press the Ctrl + F keys together to choose the search box.
- In any case, if you don’t remember the complete file name then you have to try to enter the part of the file name.
- If you only remember your file extension then you have to substitute an asterisk for that specified file name and then enter the extension also.
- At last, the results will appear on your screen.
Point to be Noted: A similar file might appear in multiple folders. The same file appears many times with different file extensions.
Follow the below-mentioned instructions to rename the EntitlementDataStore.Ecml file
Note: The Entitlement Client folder is hidden. You may need to Display hidden files and folders or search for files using Windows before performing the following steps.
- On your keyboard, press Windows+R to open the Run command.
- Copy and paste the path C:ProgramDataIntuitEntitlement Client, then press Enter.
- Right-click on the folder v8, then select Rename.
- Rename the folder to v8(OLD).
Method 2: Use the QuickBooks Database Server Manager
An alternate solution to resolve the “Unable to Sync QuickBooks License” problem is by utilizing the QuickBooks Database Server Manager to establish a connection with the server. This tool is highly efficient and aids in the smooth administration of a multi-user network.
- Firstly, download and install QuickBooks Database Server Manager (QBDSM).
- As a next step, the QBDSM needs to be configured. The steps are given below.
- Click on the Start button and search for “Services” in the search tab.
- Search for “QuickBooksDBXX” (XX represents the version number).
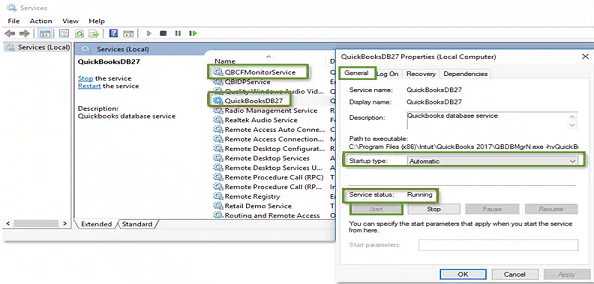
- Proceed to the General tab.
- Locate the “Service status” and if it shows as running, click on the option to stop it.
- Then, go to “Startup type” and select “Automatic”.
- Move to “Logon” and choose the “Local system account”.
- Once the local system account is selected, navigate to “Recovery” and click on the option to restart the service for the first failure, second failure, and subsequent failures.
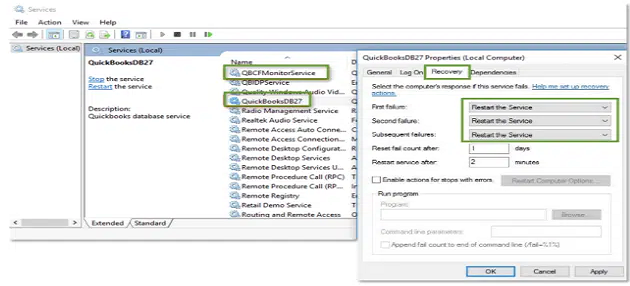
- Afterward, go back to the General tab and click on “Start”.
- This will restart the Database Manager.
You may read this:
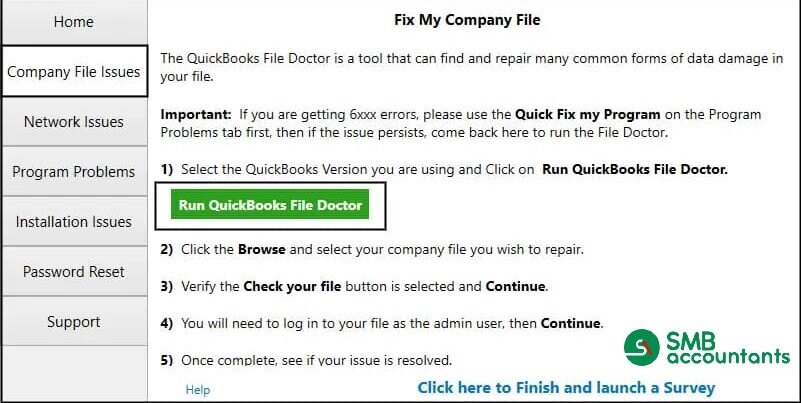
Method 3: Check for Network issues using the File Doctor Tool
Network issues may be the root of the QuickBooks Sync problem. The QuickBooks File Doctor tool may be useful in this situation:
- Installing QuickBooks Tool Hub is the first requirement for using the tool.
- Run the program after installing Tools Hub.
- Then you have to go to the Company File issues.
- Then select Run QuickBooks File Doctor from the menu.
- Now use the program to check the system for any network-related problems and resolve them.
- Any network problems that cause the Sync License problem in QuickBooks will be identified by the tool and will be automatically fixed.
Method 4: Reset The Internet Explorer Settings
The best way to resolve this error is to reset the Internet Explorer settings:
- First of all, close all open windows and programs section.
- Then, open the “Internet Explorer” option and open the Tools.
- Hit the next click on the Internet option.
- Now, you have to choose the Advanced tab.
- Go to the Reset Internet Explorer settings dialog box.
- Then, click on the Reset option.
- Users must be sure that they want to reset the Internet Explorer settings.
- Click on the Reset option.
- Once you apply the default settings, then hit the close button.
- At last, restart your system to check whether the issue is resolved or not.
Also, read this: How to Reset QuickBooks Administrator Password
Method 5: Configure the Firewall
Users should verify that the Firewall is not preventing access to QuickBooks. You have to follow the steps that are mentioned below to configure the firewall:
- From the start menu, you have to select Firewall and then you have to click Advanced Settings.
- Click on Port here, then you have to select Inbound rules with the right click.
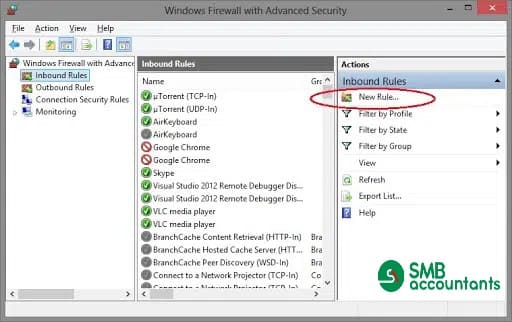
- Add the following ports after selecting the TCP option:
- 8019, XXXXX (XXXXX is the port in QuickBooks Database Server Manager) for QuickBooks 2019 users.
- For those who are using QuickBooks 2018: 8019, 56728, 55378-55382.
- For users of QuickBooks 2017: 8019, 56727, 55373–55377.
- 8019, XXXXX (XXXXX is the port in QuickBooks Database Server Manager) for QuickBooks 2019 users.
- For those who are using QuickBooks 2018: 8019, 56728, 55378-55382.
- For users of QuickBooks 2017: 8019, 56727, 55373–55377.
- 8019, XXXXX (XXXXX is the port in QuickBooks Database Server Manager) for QuickBooks 2019 users.
- For those who are using QuickBooks 2018: 8019, 56728, 55378-55382.
- For users of QuickBooks 2017: 8019, 56727, 55373–55377.
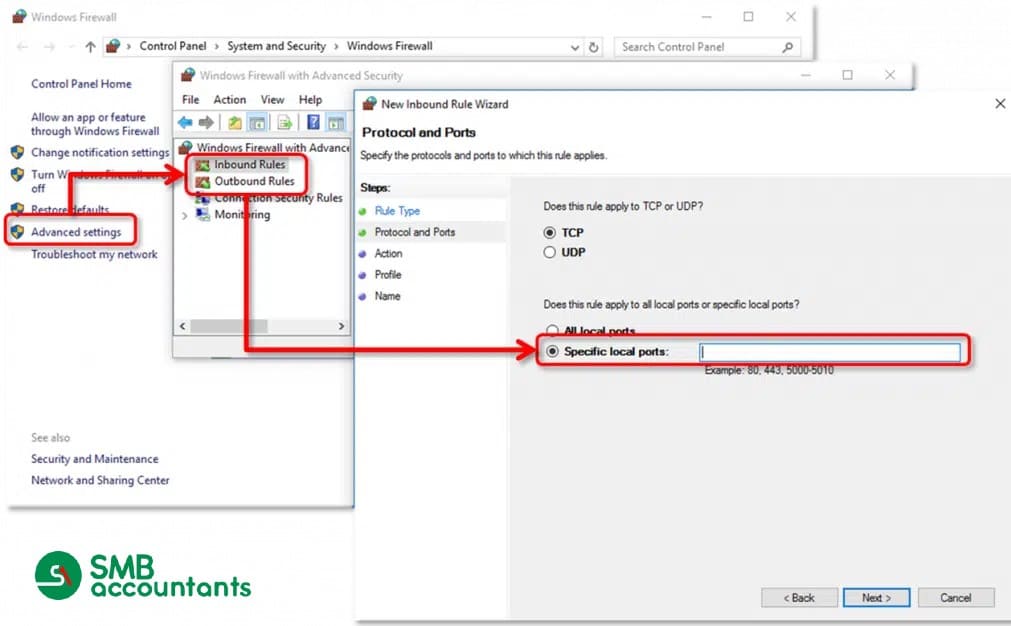
- Press the Next tab once you have selected the correct port.
- Give the rule a name and then click Finish.
- For Outbound rules, you have to repeat the steps.
Method 6: Check and Ensure The Correct License and Product Number
The user has to check and ensure the correct License and Product Number. To do this, you have to perform the below steps:
- In the first step, you have to open your QuickBooks.
- Then, press the F2 key.
- Now, the product information window will appear on your screen.
- Check your product number, license number, and product name.
- You can also view the release at the end of your product name.
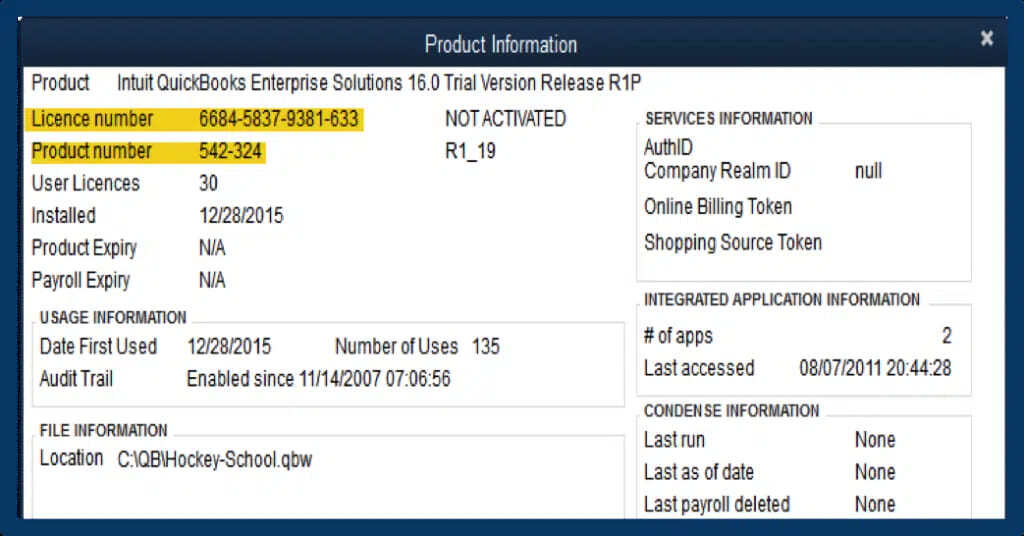
After this, you have to view the edition in the File section. The list is sorted including the earlier version also.
Method 7: Internet Connectivity is Not Blocked by The Firewall
Make sure your internet connectivity is not blocked by the firewall. If it’s blocked then you have to set up the firewall setting with the following steps:
- Firstly, you have to add the firewall port exception for the QuickBooks.
- Then, you have to open the Windows Start menu.
- Click on the “Windows Firewall” and the new window will appear on your screen.
- After this, choose the Advanced settings.
- Hit the right-click on the Inbound rules and choose the Port.
- Click on the Next button and make sure TCP is chosen.
Method 8: Perform a clean install
Try performing a clean installation of QuickBooks if none of the above-mentioned work. To do this, you must first uninstall QuickBooks and then reinstall it. Before doing this, be careful to back up your company file.
At times, there comes a scenario in which multiple staff members need to work in one company file and need access to the same QuickBooks file at the same time. If you have the same need in your business, you will need to have at least two QuickBooks licenses – one for each person simultaneously accessing the company file.
When you have the additional licenses, you can set up a second PC to see the first through a wireless or wired network. Once both computers are linked by the network, share the database with both Windows users. On the computer you accessed QuickBooks first:
Go to Help>Manage My License>Sync License Data Online
So that the original license takes care of the stuff, you have a second license attached to it. Also, you will have to switch to multi-user mode by going to File>Switch to Multi-User Mode.
How to Fix QuickBooks Could Not Load The License Data Error?
- Click on the start logo on your desktop screen. You can find the logo on the far left bottom of your desktop.
- Now navigate to Windows update from the All Programs tab.
- Here you would need to install the QuickBooks updates thus click Install Updates.
- You will now be prompted for the admin username and password.
- Now click on updates and your QuickBooks updates will be installed. Now try logging into your QuickBooks again and you will now be able to work without an error.
Need Professional Help?
If you get stuck anywhere in the process, feel free to get in touch with the SMB QuickBooks Technical Support Team, Which is available 24/7 on smbaccountants.com.
Frequently Asked Questions
Q 1: How can I remove the Entitlement file to resolve the Sync License Data in QuickBooks Desktop?
Ans: Firstly, open the window start menu then go to the search bar and write the “RUN” option Then, open the Run and write Type C:ProgramDataIntuitEntitlement Clientv8. Hit the Enter key and locate the EntitlementData. After this, open your QuickBooks file and then go to your company file. Perform the screen guidelines until you get access to register the QuickBooks.
Q 2: How to Check and Repair the Sync License Data in QuickBooks Desktop?
Ans: The thing you have to do to check and verify the entered license and product number correctly. After ensuring all details, if an error still appears on your screen then rename the “EntitlementDataStore” or check the Internet Explorer setting. Before proceeding with any troubleshooting, check the internet connectivity because a longer time is the major reason behind the sync license issue.
Q 3: How Do I Fix the QuickBooks Sync Manager Error?
Ans: There are various potential reasons for the malfunction of QuickBooks Sync Manager. These may include having an outdated version, facing connectivity problems, encountering firewall restrictions blocking Sync Manager, experiencing a corrupt or damaged company file, encountering compatibility issues with QuickBooks, having the Sync Manager service not running, or facing user account-related issues.
Q 4: Why is QuickBooks Sync Manager not working?
Ans: There are a few reasons that can stop QuickBooks Sync Manager from working:
- Connectivity error in data transfers.
- Damaged or missing files or components.
- You are missing QuickBooks Sync Manager Updates.
- Internet Security or firewall is blocking the sync.

